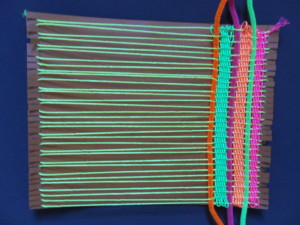
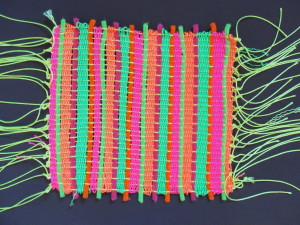
Tag Archives: kids crafts

Summer Camp: Textured Prints

Summer Camp: Textured Prints
Textured Print

Textured Print

  Materials: Printer’s ink, black and two colors Glass surface Brayer Lightweight paper (rice or bond) Cleaner Rags

  1. Squeeze a line of black ink on the flat piece of glass. Roll the brayer over it and back and forth on the glass. Cover the brayer with ink.
  2. Find a very rough surface i.e., woven fabric, a collage of leaves, brick, stone, etc. Place the paper over this surface. Hold it firmly with one hand as you roll the inked brayer back and forth over it.
  3. Ink the brayer again and try another textured surface on a clean sheet of paper.
  4. Clean the glass and brayer thoroughly and wait to dry.
  5. Squeeze ink in the second color on to the glass and roll the brayer over it. Coat the entire brayer with the ink.
  6. Roll that color over a clean sheet of paper on another surface or roll the new color over the first sheet inked in black. Try different combinations of the two colors and black and different surfaces.
  7. Frame the finished textured prints or use them to make notecards.

ALTERNATIVE PROJECT:

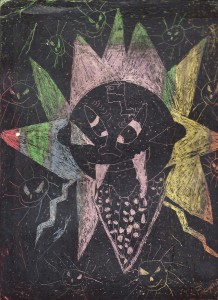
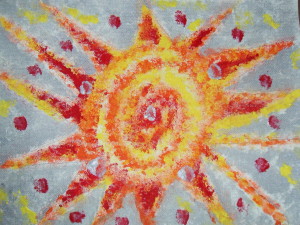
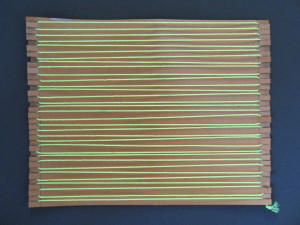
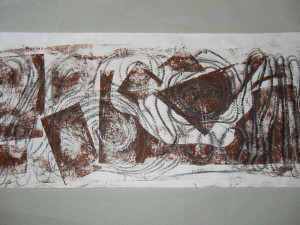
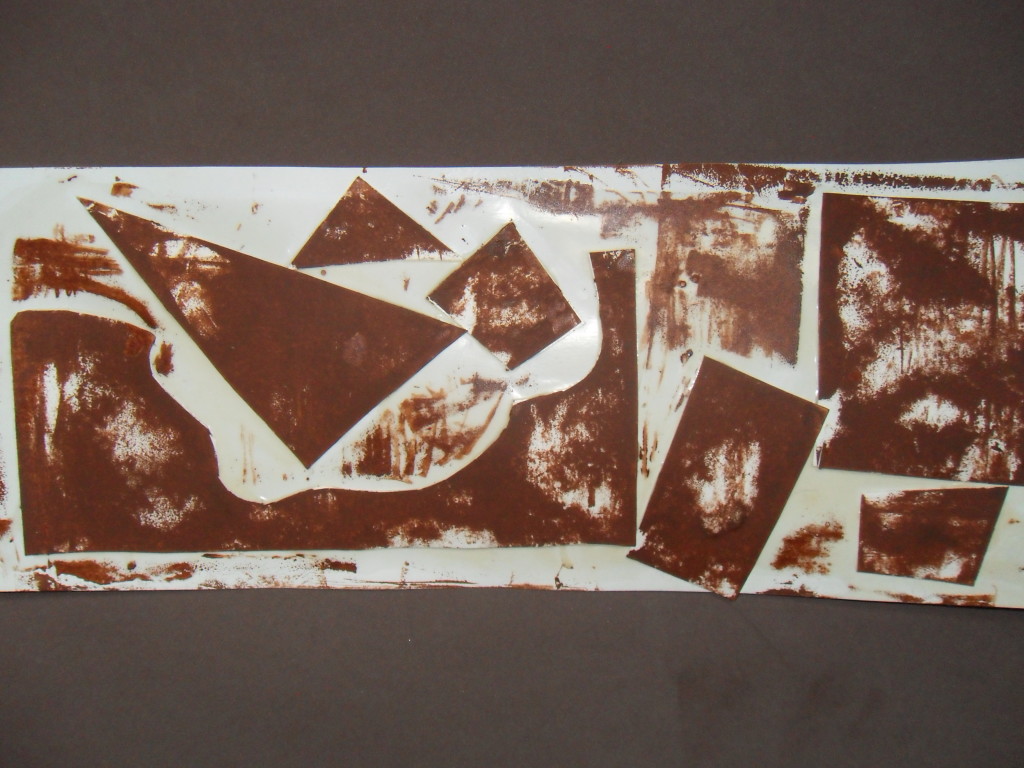
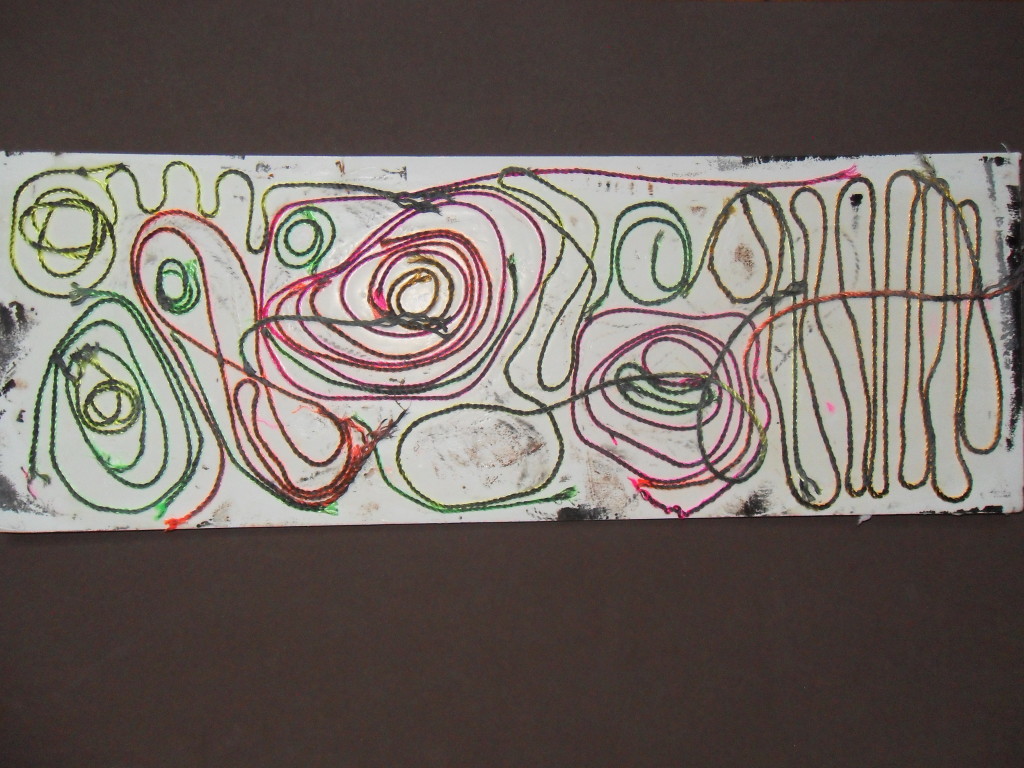
Two textured collages,the one superimposed over the second, resulted in the textured print pictured above. The print was first printed in black ink rolled over a collage made of strings arranged in a pattern and glued to a board.  Geometric patterns made from poster board comprised a second collage. After the black ink dried, the print was placed on top of this second collage. Brown ink was rolled over the geometric shapes creating the design.


Share Button

Summer Camp: Windsock

Summer Camp: Windsock
Windsocks

Windsocks


Materials:

One sheet craft foam any color

One bandana any color or design or scrap of fabric (Ribbon is a good substitute)

Ink pen or fabric marker

Additional craft foam in various colors or craft papers in assorted colors

Patterns

Peel ‘n Stick Adhesive tape

Glue

Scissors

Hole punch

  1. Trace and cut patterns provided (below) on to the large craft foam.
  2. Adhere the adhesive tape to the back of the patterns, peel the back off and arrange them on to one side of the craft foam sheets (i.e., use green foam for the leaves, yellow foam for the daisies, etc) or use glue.
  3. Run a line of glue or the adhesive tape down the length of one short edge of the craft foam. Fold down the opposite edge of the craft foam and press to form an oblong windsock.
  4. Cut 1” slits along one edge of the bandanna or fabric and tear to form long strips.
  5. Punch three evenly spaced holes along the edge of the windsock. Insert a strip of fabric or bandanna into each hole. Make a knot to hold the strip in place. Gather the opposite ends of the fabric trips and tie them together into one knot.
  6. Punch evenly spaced holes along the bottom edge of the windsock for the remaining strips of fabric. Or cut small slits and poke the fabric through with the scissors. Place each fabric strip into each hole and knot each to secure in place.

Airports use windsocks to show wind direction and relative wind speed but they are also used for decorative purposes. Windsocks made of paper and silk originated in China and Japan. The ancient Romans used windsocks as military banners.

For more information go to www.ehow.com


Share Button

Summer Camp: Sgrafitto

Summer Camp: Sgrafitto
Sgrafitto

Sgrafitto

Sgrafitto is an etching technique that uses a pointed tool to scratch through a covered surface to show the art work beneath it.

Materials:

Wax crayons (Do not use black)

India ink or back poster paint

Pointed tool for etching such as a knitting needle or a toothpick

Cardboard or mat board

Brush

  1. Draw and color various abstract shapes on the cardboard or mat board. Make sure to use a heavy hand and leave a thick layer of wax crayon.
  2. Paint the cardboard or mat board with India ink or black poster paint. Allow the surface to dry completely. If the wax crayons show through, you need a second coat of paint or ink. Allow this coat to dry.
  3. Select the pointed tool you will use. You can experiment with different tools on a scrap of cardboard and then decide which one is best for your work of art.
  4. Have an image or design in mind or draw one on sketch paper first. Etch the design directly on the painted cardboard or mat board using various strokes: long, short, or circular going in various directions: horizontal, vertical or diagonal. Etch deeply enough to penetrate the first layer of ink or poster paint.
  5. Frame the sgrafitto and don’t forget to etch your name in the lower right-hand corner.

Inspired by: All-Around-the-House Art and Craft Book by Patricia Z, Wirtenberg

Art Work by Jeffrey J. Bennett


Share Button

Summer Camp: Sponge Painting

Summer Camp: Sponge Painting
Sponge Painting: The Sun

Sponge Painting: The Sun


Materials:

Household sponges in various shapes and sizes (Household sponges found in grocery stores can create interesting patterns and designs.)

Craft paints in various colors

Water jar

Paint palette or paper palette

Printing paper like bond or rice paper or sheets of canvas

Markers or colored pencils.
Project:

  1. Draw a design or picture on a piece of paper and use it as reference for the sponge painting. Or draw directly on the surface that you are going to paint, i.e., a sheet of canvas.
  2. Cut small pieces of the sponge from the larger sponge. To create an abstract design, snip tinier pieces from the divided pieces of the larger sponge.
  3. Squeeze the paints on the palette.
  4. Dampen the sponges and squeeze out the excess water.
  5. Dab the sponge in the paint and dab it on a piece of scrap paper to test the design and the amount of paint needed. A lot of paint on a sponge will create large blobs of color on the paper or canvas.
  6. With the design as reference, dab the paint on to the paper. Do not drag the sponge because that will smear the paint (unless smearing is the effect you want to create).
  7. Remember to wash and rinse the sponge to use again or use a separate sponge for each color.
  8. Continue until you have completed the painting. Add details with a marker or colored pencil when the paint is dry.

NOTE:  In the example above,  the central design was painted first, then the background.

ADDITIONAL PROJECT:

Create a sponge painting on wood or stone.


Inspired by Arts and Crafts Activities Desk Book by Joyce Novis Laskin

Share Button

Intro to Summer Camp: Paper Garland Sign

Intro to Summer Camp: Paper Garland Sign

Materials:

Paper in various colors

Scissors

Pencil/eraser

Ruler or yard stick

Markers

Glue stick

Hole puncher

Pipe cleaners, string, paper twists or similar material

Number stencils or templates (optional)

One chain link fence

  1. Make a sign for your clubhouse or to celebrate the beginning of summer and the end of school. Make a loop for every letter of your sign and for the space between the words. Make a loop at the beginning of your sign which will be blank and a loop for the end of your sign which will also be blank. For example, a sign that says “School is out!” will have 11 loops for the words, one for the exclamation mark, two for the spaces between words and an extra loop at each end. That would be a total of sixteen loops.
  2. Use four or five different colored papers. Measure and cut the colored papers into six or more ½” x 8” strips.
  3. Glue one strip of paper measuring ½” x 8” overlapping the ends. Then glue a strip of paper measuring ½” x 8” through the first loop. Alternate the colors of the paper strips until you have the required number of paper loops forming a garland. Use the photograph for reference.
  4. Next, cut paper rectangles in various colors about 1 1/2” by 3.” Make enough to spell out your message.
  5. Trace a letter on each paper rectangle by using a template, stencil or free hand. Trace any exclamation, question mark or symbol, too.
  6. Punch a hole at the top of each paper rectangle. Punch a hole in the loops. Do not punch holes in the first and last loops and the loops that represent spaces between words.
  7. Cut string or pipe cleaners or similar material and loop it through the holes.
  8. Or use your imagination and glue seeds, glitter, sequins and other decorative objects!
  9. Tie a string through the first and last loops and tie them on to the fence. Don’t forget to add extra loops when you change the message!
Share Button

Coloring Pages from the Pittsburgh Folk Festival

Coloring Pages from the Pittsburgh Folk Festival
Dolls

Dolls

Decorated Eggs

Decorated Eggs

Share Button

Banner Designs: Summer is Fun!

Banner Designs: Summer is Fun!

WHAT IS A BANNER?

A banner is a piece of cloth suspended between two poles and often bearing a design, symbol or slogan. Banners can celebrate the seasons, holidays or bear slogans. The designs in this series of Art Tutorials celebrate summer, spring, winter and fall.

(For the first tutorial, the Summer is Fun! Banner, scroll down.)

MATERIALS

Here are some basic supplies that you will need on hand for all the banner designs:

Yardstick iron/ironing board (optional) string

Ball point pen or marker scissors tacky glue

Dowel rods Fun Foam pencil/eraser

Poster board felt or fabric squares paper towels

*Unless indicated otherwise, all felt squares should measure 9” x 12” and all sheets of Fun Foam measure 12’ x 18”.

STUFF TO KNOW

How to copy a pattern: Trace a pattern or object by placing tracing paper on its surface and tracing the design with a pencil. Turn the tracing paper over and blacken the reverse side. Then flip the tracing paper original side up again. Lay the tracing paper on the surface you want the design to transfer on to and trace the outline of the design.

Cutting a Square:

Technique #1: Measure with a ruler the size of the square. Draw the outline of the square.

Technique #2: Hold the paper flat and bring the top right corner down to the left edge. Line up the folded edges of the paper on the left side. Cut off the extra strip of paper and unfold the square.


BIBLIOGRAPHY

Holz, Loretta. Mobiles You Can Make. New York: Lothrop, Lee and Shepard Company, 1965

Zubrowski, Bernie. Mobiles: Building and Experimenting with Balancing Toys. New York: Morrow Junior Books, 1993.

Constantinides, Marion. Banners! (Unpublished)


Summer Banner Design

Banner Design


Ages: 5 – 12 years

Time: ½ hour – 1 hour

MATERIALS:

White felt square 36”x 36”

Orange Fun Foam

Yellow Fun Foam

White Fun Foam

Beige Fun Foam

Turquoise Fun Foam

Black Fun Foam

Moss

Black marker


1. Measure and cut the white felt to 14” x 20”. Holding the felt vertically, fold a 1” seam at the top and iron. Fold a second 1” seam and iron again. Glue. The dowel rod will go through this loop.

2. Using the patterns provided, trace and cut the sun from the yellow Fun Foam, the pail from the orange Fun Foam, the shell from the beige fun Foam, the shovel from the turquoise Fun Foam, and all four colors of Fun Foam for the ball. Finally, cut the sunglasses from the black Fun Foam. Glue the pieces down.

3. Take a small amount of moss and glue it on the top of the pail. Press down firmly while it dries.

4. Use a black marker to draw the sun’s cheeks, smile and nose. Sketch a few lines on the shell to make it look three-dimensional. Also, spell out “Summer Is Fun”!

5. Cut the dowel rod to about 16” x 18”. Insert through the loop at the top of the felt. Cut string to a length that is suitable for hanging. Tie the string to the ends of the dowel rod and hang.

Have a fun summer!

Share Button

Banner Designs: Spring is Here!

Banner Designs: Spring is Here!

WHAT IS A BANNER?

A banner is a piece of cloth suspended between two poles and often bearing a design, symbol or slogan. Banners can celebrate the seasons, holidays or bear slogans. The designs in this series of Art Tutorials celebrate summer, spring, winter and fall.

(For the first tutorial, the Spring is Here! Banner, scroll down.)

MATERIALS

Here are some basic supplies that you will need on hand for all the banner designs:

Yardstick

Iron/ironing board (optional)

String

Ball point pen or marker

Scissors

Tacky glue

Dowel rods

Fun Foam

Pencil/eraser

*Unless indicated otherwise, all felt squares should measure 9” x 12” and all sheets of Fun Foam measure 12’ x 18”.

STUFF TO KNOW

How to copy a pattern:

Trace a pattern or object by placing tracing paper on its surface and tracing the design with a pencil. Turn the tracing paper over and blacken the reverse side. Then flip the tracing paper original side up again. Lay the tracing paper on the surface you want the design to transfer on to and trace the outline of the design.

Cutting a Square:

Technique #1: Measure with a ruler the desired size of the square. Draw the outline of the square.

Technique #2: Hold the paper flat and bring the top right corner down to the left edge. Then fold the paper and line up the edges on the left so that they are straight. Cut off the extra strip of paper and unfold the square.

BIBLIOGRAPHY

Holz, Loretta. Mobiles You Can Make. New York: Lothrop, Lee and Shepard Company, 1965

Zubrowski, Bernie. Mobiles: Building and Experimenting with Balancing Toys. New York: Morrow Junior Books, 1993.

Constantinides, Marion. Banners! (Unpublished)


SPRING BANNER

Spring Banner Design

Ages: 5 – 12 years

Time: ½ hour – 1 hour

MATERIALS:

White felt 36” x 36”

Green Fun Foam

Pink Fun Foam Pink Fun Foam

Blue Fun Foam

1. Measure and trim white felt to 14” x 20”. Place the piece vertically in front of you. Measure and fold a 1” seam at the top and iron. Fold another 1” seam. Iron and glue the second fold. The dowel rod will go through this loop.

2. Trace and cut the flower shapes using the patterns provided: yellow Fun Foam for one tulip and one daisy; pink for the second tulip and daisy; blue for the three morning glories; pink for the butterfly and green for the stems and leaves. (NOTE: The daisy and the tulip have different leaves.)

3. Cut one small yellow circle for the center of the pink daisy and one small pink circle for the yellow daisy.

4. Glue all the pieces, scattering the shapes randomly to create a cascading effect. Avoid placing two flowers of the same color next to each other.

5. Draw the centers of the morning glories with a black marker. Add antennae to the butterfly and dots in its center.

6. Cut the dowel rod like the other ones, insert, tie the string to the ends of the dowel rod and hang!

Share Button

Our Imaginations! Camp for Kids: Weaving with a Simple Frame

Our Imaginations! Camp for Kids: Weaving with a Simple Frame

The craft WEAVING WITH A SIMPLE FRAME is an updated adaption of the project “A Simple Weaving Frame” found in The Reinhold Book of Arts and Crafts Techniques published by Van Nostrand Reinhold Co., a division of Litton Education Publishing Inc. in 1976. Many important events happened in 1976.

Challenge yourself and always use your imagination!

Materials: Cardboard

String

Ruler

Pencil/eraser

Scissors

Yarn

Large-eyed tapestry needle (optional)

Ribbon, feathers,  wool and other strips of fabric, leaves, twigs, string

* At all times refer to the photo illustrations.

  1. Weaving consists of a warp and a weft. The warp comprises the vertical strings of the loom while the weft consists of the yarn interlaced through the weft. Take a piece of strong cardboard. Measure and cut ¼” incisions at regular intervals of ¼” to 1/8” on both ends of the cardboard.
  2. To make the warp: Take heavy string (i.e., kite string) and make a knot at one end. Loop the string from one end of the cardboard to the other and back up again. When finished, cut and make a knot in the back or tape the end of the string to the back of the cardboard. (Always leave a little extra string at either end.)
  3. To make the weft: Think of a theme or a design for the weaving. The design is up to you! Use a variety of materials to weave in and out as you did with the paper weaving. (The weaving below was woven with pipe cleaners and kite string but almost anything goes!)
  4. Start with about an inch and a half of warp at the bottom. Make sure strips of material alternate with each row. Roll the material into a ball if possible and pass it through the warp back and forth for several rows depending on the design. Tuck the end in the back of the warp. Do not tie a knot.
  5. Tips: Consider using a the tapestry needle to weave the yarn and string. A ruler will help you lift the warp so you can pass material through easily but you must lift every other string (see step 4.)
  6. When the weaving is finished, cut any loose thread in the back of the warp but don’t cut too close to the weft.
Frame for weaving

Frame for weaving

Preparing the frame

Preparing the frame


Beginning to weave

Beginning to weave


The finished weaving

The finished weaving

v

Share Button

Kid’s Crafts: Red, White and Blue Banner

Kid’s Crafts: Red, White and Blue Banner

RED WHITE AND BLUE BANNER

Fourth of July Banner

Red, White and Blue Banner

Ages: 5 – 12 years

Time: one hour

MATERIALS:

White felt 14” x 18”

Red, white, blue craft foam sheets

Sharp tool like an awl

¼” red, white and blue ribbon

Dowel rod 18”

String – double the length of the dowel rod

Measure and cut white felt to 14” x 20”. Place felt horizontally. Make a loop by measuring and folding and ironing a 1” seam. Measure and fold a second 1” seam. Iron and glue the second fold. You will be inserting the dowel rod through this loop. (This piece of felt should now measure  14” x 16”.)

Using templates or stencils trace the large star pattern and cut one large star out of the white craft foam sheet. Cut 13 smaller stars out of the white craft foam using the smaller star pattern. Trace and cut a large circle out of the blue craft foam sheet. Glue the large star in the center. Arrange the smaller stars around the circle. Make sure that they all face the same way. Lay aside.

Measure and cut 7 stripes ¾” x 16” out of the red craft foam sheet. Arrange the stripes on the banner so that there is a ¾” stripe of white felt showing between them. (Refer to the photo of the banner.) Glue the stripes down and trim if necessary.

Glue the blue circle with the stars in the center of the red and white stripes.

At the bottom of the banner, poke holes every 1” with a sharp tool like an awl. (Small children should let adults do this for them.) Insert the ribbon in the holes, alternating the colors. Pull the ribbon through and tie a knot in the back.

Trim the dowel rod to 18”. Cut a piece of string to a length suitable for hanging. Tie the string to each end of the dowel rod. The first Fourth of July celebration occurred in Philadelphia, PA. Eventually, all the states celebrated the holiday which included parades, picnics, military displays and fireworks.

VARIATION: You can also hang your banner on Memorial Day or Labor Day!


Share Button