Tag Archives: summer crafts

SUMMER CRAFTS: HOJALOTA

SUMMER CRAFTS: HOJALOTA

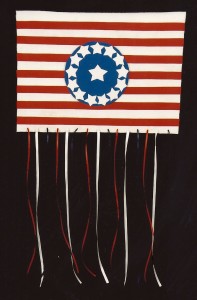
What is hojalata? A hojalata is Mexican tin art used to create ornate and often practical objects like boxes or hangings or candelabras and more.


HOJALOTA

HOJALOTA


Materials:

Disposable round aluminum pan

Paper

Permanent markers (Optional: use paints specifically for metal, brushes and a water container)

Scissors

Newspaper

Puncher to make holes

Jump rings

String


Project:

  1. Cover the work table. Place the disposable aluminum pan on a piece of colored paper and trace the bottom of the pan so you have a circle.
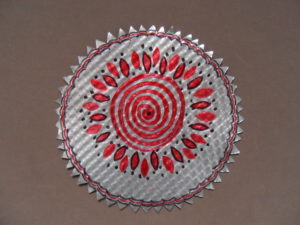
  2. Sketch a design on a piece of paper: the sun, flowers, cactus, birds, the moon, an animal, etc. (Traditionally, humorous or religious or cultural objects are drawn by hojalata artists.) Then draw the design in the circle using a black marker. Cut out the circle and the bottom of the aluminum pan.
  3. Lay the drawing on the aluminum pie pan circle. Pushing hard enough to mark the metal, trace the design with a sharp pencil or similar tool.
  4. Turn the aluminum pie pan circle over and color in the design with permanent markers.
  5. Punch a hole at the top of the pie pan circle, pull a piece of string through and hang the hojalata.
  6. If you make more than one, you can string them by punching a hole at the top and bottom of each and connecting them with jump rings.
  7. Loop a piece of string through the hole of the top hojalata and hang. If you hang the hojalatas outdoors, watch them shine in the sum or blow in the wind!


Share Button

MORE KID’S CRAFTS: Magical Wands

MORE KID’S CRAFTS: Magical Wands

MATERIALS:

Model Magic – white

Dowel rod, 12 – 14 inches in length

White glue

Markers – color(s) of choice

Beads/sequins/glitter/feathers

Curling ribbon – color(s) of choice

Scissors

Brush

PROJECT:

  1. Make a big fist-sized ball of Model Magic. Using a rolling pin or the palm of your hand, flatten out the Model Magic into a rectangle about ¼” thick.
  2. Make sure a corner of the flattened piece comes to a point. Place this piece vertically on the work surface. Squeeze the sides to form points. Refer to the photos above.
  3. Squeeze the bottom of the piece to form two points, too. You should now have five-pointed star: one point at the top, and two on either side and at the bottom.
  4. Color the dowel rod with markers. Insert it between the two points at the bottom.
  5. Push beads, feathers and sequins into the star. Apply glue to the surface of the Model Magic and cover it with glitter. Shake off the excess.
  6. Cut 3 or 4 pieces of curling ribbon 12” long. Tie the ribbon just under the star. Curl the ribbon with one of the scissor blades.

OPTIONAL: Make other shapes!

You now have a magical wand!

Share Button

Our Imaginations! Part 1: A Tale of Two Umbrellas!

Our Imaginations! Part 1: A Tale of Two Umbrellas!


Umbreall

Blue, Green, and Chartreuse Umbrella


Read: The Umbrella by Ingrid and Dieter Schubert

A family dog finds a red umbrella on a windy day in the yard. When the dog opens up the umbrella, the wind carries them over the clouds and around the world. They go to Africa where the dog confronts elephants, alligators, hippos, zebras and storks; the oceans and their inhabitants; the tropics; the North Pole and finally, back home.

Project: Decorate an old umbrella and if you want to challenge yourself, give the design a theme: animals, fairies, sports, etc.

Materials:

An old umbrella

Glue

Beads

Markers

Sequins

Buttons

Silk flowers

Ribbons

Stencils

Paint in squeeze bottles

Stickers 

Additional Reading:

The Umbrella by Jan Brett

The Umbrella Day by Nancy Evans

Umbrella by Taro Yashima

*Copyright Art work by Marion Constantinides 2015

Share Button

Kid’s Crafts: Red, White and Blue Banner

Kid’s Crafts: Red, White and Blue Banner

RED WHITE AND BLUE BANNER

Fourth of July Banner

Red, White and Blue Banner

Ages: 5 – 12 years

Time: one hour

MATERIALS:

White felt 14” x 18”

Red, white, blue craft foam sheets

Sharp tool like an awl

¼” red, white and blue ribbon

Dowel rod 18”

String – double the length of the dowel rod

Measure and cut white felt to 14” x 20”. Place felt horizontally. Make a loop by measuring and folding and ironing a 1” seam. Measure and fold a second 1” seam. Iron and glue the second fold. You will be inserting the dowel rod through this loop. (This piece of felt should now measure  14” x 16”.)

Using templates or stencils trace the large star pattern and cut one large star out of the white craft foam sheet. Cut 13 smaller stars out of the white craft foam using the smaller star pattern. Trace and cut a large circle out of the blue craft foam sheet. Glue the large star in the center. Arrange the smaller stars around the circle. Make sure that they all face the same way. Lay aside.

Measure and cut 7 stripes ¾” x 16” out of the red craft foam sheet. Arrange the stripes on the banner so that there is a ¾” stripe of white felt showing between them. (Refer to the photo of the banner.) Glue the stripes down and trim if necessary.

Glue the blue circle with the stars in the center of the red and white stripes.

At the bottom of the banner, poke holes every 1” with a sharp tool like an awl. (Small children should let adults do this for them.) Insert the ribbon in the holes, alternating the colors. Pull the ribbon through and tie a knot in the back.

Trim the dowel rod to 18”. Cut a piece of string to a length suitable for hanging. Tie the string to each end of the dowel rod. The first Fourth of July celebration occurred in Philadelphia, PA. Eventually, all the states celebrated the holiday which included parades, picnics, military displays and fireworks.

VARIATION: You can also hang your banner on Memorial Day or Labor Day!


Share Button

Our Imaginations! Camp for Kids: Nature Prints

Our Imaginations! Camp for Kids: Nature Prints

The craft NATURE PRINTS was adapted from the project “From the Yard/Nature Prints” found in All-Around-the-House Art and Craft Book by Patricia Z. Wirtenberg and published by Houghton Mifflin Company in1968

Materials:

Leaves, bark, twigs

Printer’s inks or poster or acrylic paints in various colors (cheaper to use)

Drawing pencils (optional)

Rice or bond paper in white or various light colors (works best with poster/acrylic paints)

Brown wrapping paper or construction paper for use with printer’s inks

Brayer (or roller)

Piece of glass

Newspaper

Solvent for cleaning brayer and glass if using printer’s inks unless using water-soluble printer’s inks

  1. Collect fresh leaves from the trees or bushes in your neighborhood or yard. You will need some to experiment with and some for the last print. Other objects such as tree bark (if it’s easy to peel off) and even some twigs will work along with the leaves, too.
  2. Cover your work surface with newspaper. Lay down the glass and brayer on the work surface. Select the paints or inks that you will use. Acrylic or poster paints are less expensive than oil-based printer’s inks and easier to clean up after use.
  3. You can squeeze one color for each leaf or squeeze two or three colors side-by-side on the glass. The leaves in the samples shown used one or two or three colors at one time.
  4. Roll the paint or inks on the glass until the pigment covers the brayer. If you are using more than one color, let the colors run into each other. Roll the brayer over the leaf several times and turning the leaf over, lay it on a piece of paper like rice paper or bond paper. Use your hand to press the leaf so that it prints on the paper. Paper that is not too thick or too thin is the best to use if using acrylic or poster paints. Printer’s inks can use a slightly heavier paper like construction or brown wrapping paper.
  5. Remove the leaf and see how it printed on the paper. Experiment until you have a print that you like. Experiment with other materials from nature combined with the leaves.
  6. To create a mixed media design, color the whites of the leaves or the background paper or outline the printed leaves with colored pencils. See the two samples below.
  7. Frame the print or using old note card stationery, make note cards or poster cards of the printed leaves. They make a thoughtful gift for people who still write notes!
Nature Prints

Nature Prints


Nature Prints

Nature Prints


Nature Prints

Nature Prints


VARIATION:

Make a sun print! Make sure you do this on a sunny day! Choose the objects you will use as the main design of the print. Objects like leaves, twigs, bark, seashells, and pebbles work well. Lay the objects that you choose on photographic, construction or drawing paper on a surface in a sunny location. The longer you leave it there, the deeper an impression your objects will make on the paper. Leave the objects and paper in the sun for four hours minimum. Remove the objects. You now have a sun print! Use the sun print for the nature collage tutorial or frame it and hang the print on your bedroom wall.


Sun Print

Sun Print


Share Button