Monthly Archives: December 2014

Our Imaginations! Paper Cut-Outs: Spring/The Four Seasons Mural

Our Imaginations! Paper Cut-Outs: Spring/The Four Seasons Mural
Spring Panel

Spring Panel Four Seasons Paper Cut-outs

MATERIALS:

Paper

Scissors

Pencil/eraser

Tracing paper

Glue Stick


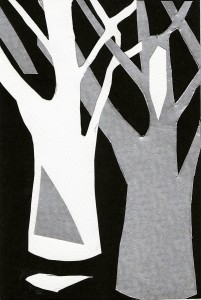
  1. Research the paper cutouts of Henri Matisse which are a mix symbolic and abstract shapes. “I have attained a form, filtered to the essentials,” Matisse once said and this sums up his philosophy as an artist. Study the paper cutouts for color and form; www.henri-matisse.net/cut_outs.html.
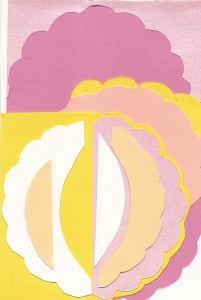
  2. There will be four panels or sections for the Four Seasons Mural. The second section will be spring. Plan the design for the season. The sample shown features flowers. There are other symbols for spring: rain, butterflies, bees, birds, grass, etc. Sketch your design on tracing paper.
  3. The sample features five spring-like colors: white, peach, yellow, and two shades of pink. Other colors that evoke spring are pastel shades of most colors. Limit the palette to three to five colors as in the sample.
  4. Decide the size of the paper cutout. The sample shown is 4” x 6.” Cut the background paper to the size you want for the paper cutout. The sample shows a medium pink as the background color. Light pink, peach, yellow and white are the color choices for the flowers.
  5. Sketch the design on tracing paper. Decide the colors for each part of the design. Blacken the back of the design and flip it over on to the papers you will use. Trace the outline of the shapes.
  6. Use embroidery scissors to cut out the shapes. Embroidery scissors enable you to cut inside larger shapes.
  7. Glue the shapes down on to the background paper and you have the second section of the Four Seasons Mural: Spring!


Share Button

Our Imaginations! Paper Cut-outs: Winter/The Four Seasons Mural

Our Imaginations! Paper Cut-outs: Winter/The Four Seasons Mural
Four Seasons Paper Cut-out/Winter

Winter Panel Four Seasons Paper Cut-out Mural

MATERIALS:

Papers Scissors

Tracing paper

Glue Stick

  1. Research the paper cutouts of Henri Matisse which are a mix of symbolic and abstract shapes. “I have attained a form, filtered to the essentials,” Matisse once said and this sums up his philosophy as an artist. Study the paper cutouts for color and form; www.henri-matisse.net/cut_outs.html.
  2. There will be four panels or sections for the Four Seasons Mural. The first section will be winter. Plan the design for the season. The sample shown features barren trees. There are other symbols for winter: ice sickles, snowballs, snowflakes, snow-capped mountain peaks, mittens, scarves, knitted caps, etc. Sketch your design on tracing paper.
  3. The sample features three colors that evoke winter: black, silver and white. Other colors that evoke winter include shades of gray and cool shades of blue but mittens and other winter clothing come in a variety of colors. Limit the palette to three colors.
  4. Decide the size of the paper cutout. The sample shown is 4” x 6.” Cut the background paper to the size you want for the paper cutout. The sample shows black as the background color. Silver and white are the color choices for the trees.
  5. Sketch the design on tracing paper. Decide the colors for each part of the design. Blacken the back of the design and flip it over on to the papers you will use. Trace the outline of the shapes.
  6. Use embroidery scissors to cut out the shapes. Embroidery scissors enable you to cut inside larger shapes.
  7. Glue the shapes down and you have the first section of the Four Seasons Mural. Winter is here!


Share Button

Fence Weaving for the Holidays: Paper Garland

Fence Weaving for the Holidays: Paper Garland

Materials:

Paper in 4 holiday colors or colors of choice

Scissors

Pencil/eraser

Ruler or yard stick

Beads, glitter or similar craft items (optional)

Glue stick

Ribbon, paper twist, strips of fabric or similar material

One chain link fence


  1. Use three or four different colored papers. The sample in the photograph uses red, green, silver and brown. Measure and cut one of the colored papers into six ½” x 8” strips.
  2. Measure and cut the next colored paper into seven strips measuring ½” x 6.”
  3. Glue one strip of paper measuring ½” x 6.” Then glue a strip of measuring ½” x 8” through the first loop. Alternate the colors of the paper strips until you have 13 paper loops in two different colors forming a garland. (For example, the pattern would be red, green, red, green, etc.) Use the photograph for reference.
  4. Next, measure and cut the paper of the third color into 16 strips of 1/2” x 5.”
  5. Glue one strip of that paper through one of the loops measuring ½” x8”. Glue another strip through that same loop so that the loops hang down from the first loop. Use as many strips to form loops of the third color as you wish. The sample in the photograph used four strips of that color. Continue to glue strips of the third color into loops hanging down from the larger loops. The sample shows four smaller loops of paper flowing vertically from four larger loops for a total of 16 loops of the third color.
  6. Proceed in the same way with the fourth colored paper. Cut strips measuring ½” x 5.” Loop the strips vertically from the second colored paper. See the photograph of the sample for reference.
  7. Optional: glue glitter or sequins or small beads on any or all the loops. Use small beads and be aware that heavy or large beads can drag down the paper loops.
  8. Loop the ribbon through one of the paper loops at one end, then weave the ribbon in and out of the chain link fence. Tie a bow at the top. Repeat this step at the other end and in the middle.
  9. Or use your imagination and use other decorative objects!
  10. Hang from the fence during the holiday season.
Share Button

Kid’s Crafts: Mr. and Mrs. Snowman Winter Banner

Kid’s Crafts: Mr. and Mrs. Snowman Winter Banner


Winter Banner Design

Mr. and Mrs. Snowman Winter Banner

Ages: 5 – 12 years

Time: ½ hour

MATERIALS:

blue felt square 36” x 36”

black Fun Foam white Fun Foam

brown Fun Foam blue Fun Foam

orange Fun Foam red Fun Foam

silver glitter pen

Measure and trim blue felt square to 14” x 20”. Place felt vertically.

Measure and fold a 1” seam at the top. Iron.

Fold a second 1” seam. Iron and glue the second fold. (You will be inserting the dowel rod through this loop.)

Using the patterns provided, trace and cut two large, two medium, and tow small circles from the white Fun Foam.

Glue these pieces to the blue background towards the center of the material.

Trace and cut the following:

The snow woman’s scarf and beret from the red Fun Foam

The snowman’s and snow woman’s noses from the orange Fun Foam

The snow woman’s buttons from the blue Fun Foam

The snowman’s hat, pipe and buttons from the black Fun Foam

The snowman’s scarf from the brown Fun Foam

Glue these pieces.

Make snowflakes and dots to show the mouths with the glitter pen.

Draw sticks to show the hands.

Trim the dowel rod to about 16” x 18”. Insert dowel rod through the loop. Cut the string to a length suitable for hanging and tie to each end of the dowel rod.

Hang from a window, door or wall.

Share Button