Tag Archives: felt banner design

CELEBRATE THE SEASONS: SUMMER IS FUN! BANNER

CELEBRATE THE SEASONS: SUMMER IS FUN! BANNER

WHAT IS A BANNER?

A banner is a piece of cloth suspended between two poles and often bearing a design, symbol or slogan. Banners can celebrate the seasons, holidays or bear slogans. The designs in this series of Art Tutorials celebrate summer, spring, winter and fall.

SUMMER IS FUN!

SEASONAL PROJECT: SUMMER IS HERE! BANNER

       SEASONAL PROJECT    

Ages: 5 – 12 years

Time: ½ hour – 1 hour

MATERIALS:

White felt square 36”x 36

Orange Fun Foam*

Yellow Fun Foam

White Fun Foam

Beige Fun Foam

Turquoise Fun Foam

Black Fun Foam

Moss

Black marker


1. Measure and cut the white felt to 14” x 20”. Holding the felt vertically, fold a 1” seam at the top and iron. Fold a second 1” seam and iron again. Glue. The dowel rod will go through this loop.

2. Enlarge the photo of the completed banner (above). Then trace and cut the sun from the yellow Fun Foam, the pail from the orange Fun Foam, the shell from the beige fun Foam, the shovel from the turquoise Fun Foam, and all four colors of Fun Foam for the ball. Finally, cut the sunglasses from the black Fun Foam. Glue the pieces down.

3. Take a small amount of moss and glue it on the top of the pail. Press down firmly while it dries.

4. Use a black marker to draw the sun’s cheeks, smile and nose. Sketch a few lines on the shell to make it look three-dimensional. Also, spell out “Summer Is Fun”!

5. Cut the dowel rod to about 16” x 18”. Insert through the loop at the top of the felt. Cut string to a length that is suitable for hanging. Tie the string to the ends of the dowel rod and hang.

Have a fun summer!

Fun Foam is also called craft foam.

Share Button

KID’S CRAFTS: Red,White and Blue Banner

KID’S CRAFTS: Red,White and Blue Banner

Fourth of July Banner

Red, White and Blue Banner

Ages: 5 – 12 years

Time: one hour

MATERIALS:

White felt 14” x 18”

Red, white, blue craft foam sheets

Sharp tool like an awl

¼” red, white and blue ribbon

Dowel rod 18”

String – double the length of the dowel rod

Measure and cut white felt to 14” x 20”. Place felt horizontally. Make a loop by measuring and folding and ironing a 1” seam. Measure and fold a second 1” seam. Iron and glue the second fold. You will be inserting the dowel rod through this loop. (This piece of felt should now measure  14” x 16”.)

Using templates or stencils trace the large star pattern and cut one large star out of the white craft foam sheet. Cut 13 smaller stars out of the white craft foam using the smaller star pattern. Trace and cut a large circle out of the blue craft foam sheet. Glue the large star in the center. Arrange the smaller stars around the circle. Make sure that they all face the same way. Lay aside.

Measure and cut 7 stripes ¾” x 16” out of the red craft foam sheet. Arrange the stripes on the banner so that there is a ¾” stripe of white felt showing between them. (Refer to the photo of the banner.) Glue the stripes down and trim if necessary.

Glue the blue circle with the stars in the center of the red and white stripes.

At the bottom of the banner, poke holes every 1” with a sharp tool like an awl. (Small children should let adults do this for them.) Insert the ribbon in the holes, alternating the colors. Pull the ribbon through and tie a knot in the back.

Trim the dowel rod to 18”. Cut a piece of string to a length suitable for hanging. Tie the string to each end of the dowel rod. The first Fourth of July celebration occurred in Philadelphia, PA. Eventually, all the states celebrated the holiday which included parades, picnics, military displays and fireworks.

VARIATION: You can also hang your banner on Memorial Day or Labo

Share Button

Kid’s Crafts: Mr. and Mrs. Snowman Winter Banner

Kid’s Crafts: Mr. and Mrs. Snowman Winter Banner


Winter Banner Design

Mr. and Mrs. Snowman Winter Banner

Ages: 5 – 12 years

Time: ½ hour

MATERIALS:

blue felt square 36” x 36”

black Fun Foam white Fun Foam

brown Fun Foam blue Fun Foam

orange Fun Foam red Fun Foam

silver glitter pen

Measure and trim blue felt square to 14” x 20”. Place felt vertically.

Measure and fold a 1” seam at the top. Iron.

Fold a second 1” seam. Iron and glue the second fold. (You will be inserting the dowel rod through this loop.)

Using the patterns provided, trace and cut two large, two medium, and tow small circles from the white Fun Foam.

Glue these pieces to the blue background towards the center of the material.

Trace and cut the following:

The snow woman’s scarf and beret from the red Fun Foam

The snowman’s and snow woman’s noses from the orange Fun Foam

The snow woman’s buttons from the blue Fun Foam

The snowman’s hat, pipe and buttons from the black Fun Foam

The snowman’s scarf from the brown Fun Foam

Glue these pieces.

Make snowflakes and dots to show the mouths with the glitter pen.

Draw sticks to show the hands.

Trim the dowel rod to about 16” x 18”. Insert dowel rod through the loop. Cut the string to a length suitable for hanging and tie to each end of the dowel rod.

Hang from a window, door or wall.

Share Button

Kid’s Crafts: Red, White and Blue Banner

Kid’s Crafts: Red, White and Blue Banner

RED WHITE AND BLUE BANNER

Fourth of July Banner

Red, White and Blue Banner

Ages: 5 – 12 years

Time: one hour

MATERIALS:

White felt 14” x 18”

Red, white, blue craft foam sheets

Sharp tool like an awl

¼” red, white and blue ribbon

Dowel rod 18”

String – double the length of the dowel rod

Measure and cut white felt to 14” x 20”. Place felt horizontally. Make a loop by measuring and folding and ironing a 1” seam. Measure and fold a second 1” seam. Iron and glue the second fold. You will be inserting the dowel rod through this loop. (This piece of felt should now measure  14” x 16”.)

Using templates or stencils trace the large star pattern and cut one large star out of the white craft foam sheet. Cut 13 smaller stars out of the white craft foam using the smaller star pattern. Trace and cut a large circle out of the blue craft foam sheet. Glue the large star in the center. Arrange the smaller stars around the circle. Make sure that they all face the same way. Lay aside.

Measure and cut 7 stripes ¾” x 16” out of the red craft foam sheet. Arrange the stripes on the banner so that there is a ¾” stripe of white felt showing between them. (Refer to the photo of the banner.) Glue the stripes down and trim if necessary.

Glue the blue circle with the stars in the center of the red and white stripes.

At the bottom of the banner, poke holes every 1” with a sharp tool like an awl. (Small children should let adults do this for them.) Insert the ribbon in the holes, alternating the colors. Pull the ribbon through and tie a knot in the back.

Trim the dowel rod to 18”. Cut a piece of string to a length suitable for hanging. Tie the string to each end of the dowel rod. The first Fourth of July celebration occurred in Philadelphia, PA. Eventually, all the states celebrated the holiday which included parades, picnics, military displays and fireworks.

VARIATION: You can also hang your banner on Memorial Day or Labor Day!


Share Button

Kid’s Crafts: Easter Egg Banner

Kid’s Crafts: Easter Egg Banner

EASTER

Easter celebrates Jesus Christ’s resurrection that usually occurs during springtime. The holiday includes a forty-day period of fasting known as Lent which ends on Easter Sunday with joyous feasting.

Easter is a “movable feast” which Christians celebrate on a different day each year. Easter, like other holidays, has its roots in pagan rituals and beliefs. Some historians believe that the word “Easter” derives from the name “Eastre,” the Teutonic goddess who represented springtime and fertility. Pagans celebrated her festival on the first day of spring.

Easter symbols include the Easter rabbit, a symbol of fertility, and eggs dyed in different colors which symbolize birth.  The  Ukrainian tradition of Pysanky or egg dyeing influenced the Easter banner design in the craft project below. (The word “pysanky” means “to write.”) Ukrainian Easter eggs are known all over the world for their beauty and colorful, intricate designs. The number of symbols and colors used in the design of the eggs grew as the craft became popular.

Each object/symbol and color has a special meaning:

Sun – the source of light and life

Star – success

Birds – spring, a good harvest

Heart – love

Fruits and vegetables – the good life

Wheat – the life’s work of the Ukrainian peasant

Animals – prosperity and wealth

Bees – hard work

Tree – strength, long life, good health, youthfulness

White – purity

Yellow – wisdom, a successful harvest

Green – spring, rebirth of nature

Blue – good health, sky, air, magic

Red – happiness, passion, hope

Brown – earth, mountains

Purple – faith, trust

Ukrainian eggs are first divided into triangles, squares or circles and then other objects are added: the sun, flowers, wheat, etc.

EASTER EGG BANNER PROJECT0001


EASTER EGG BANNER

Ages: 5 – 12 years

Time: one hour

MATERIALS:

Pink craft foam sheet

Blue craft foam sheet

Yellow craft foam sheet

Yellow felt square 14” x 20”

Dowel rod 18”

String – double the length of the dowel rod

Measure and cut the yellow felt square to 14” x 20” and place it vertically. Make a loop by measuring and folding a 1” seam and iron. Measure and fold a second 1” seam. Iron and glue the second fold. You will be inserting the dowel rod through this loop. (This felt piece should now measure  14”x18”.)

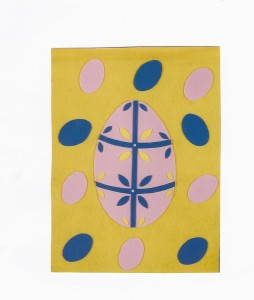
Using templates or stencils trace and cut a large egg from the pink craft foam sheet. Glue it on the center of the yellow felt piece. Cut the double cross pattern, 5 small eggs, six small petals, and 4 large petals out of the blue craft foam sheet. Cut six small petals and 4 large petals from the yellow craft foam sheet. Cut 5 small eggs and 2 tiny circles from the pink craft foam sheet.

Glue the double cross on the large egg. Place 4 large yellow petals near the center of the top cross. Glue a pink dot in the center of the cross. Arrange 6 blue petals near the top and sides of the cross. Glue 4 large blue petals near the intersection at the bottom of the cross. Glue a pink dot in the center of the bottom cross. Arrange 6 small yellow petals near the bottom and sides of the cross and glue. Glue small blue and pink eggs in a random pattern around the central egg.

Cut the dowel rod to approximately18”. Insert a loop at the top. Cut the string to a length suitable for hanging. Tie the string to the ends of the dowel rod. Decorate your home by hanging the Easter Egg Banner from a window, on a wall or door.

VARIATION: What other symbols have special meaning to you? Use them in your own Easter Egg Design.


Share Button