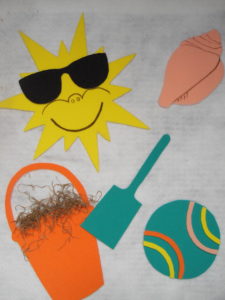
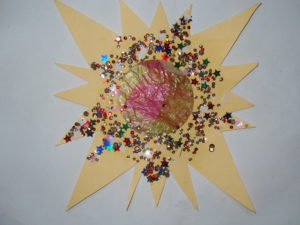
Tag Archives: craft foam

SUMMER CRAFTS: AZTEC SUN

SUMMER CRAFTS: AZTEC SUN
Aztec Sun

Aztec Sun

Materials:

Two bowls (or plates or other round object)

Ruler

Yellow craft foam

Pencil

Scissors

Tissue paper in four different colors

Wax paper

Mod Podge

Foam brush

Puffy paint

Glue

Hole punch

String


Project:

  1. Center a large bowl upside down on the yellow craft foam.
  2. Draw triangles all around the bowl with a pencil indicating the sun’s rays.
  3. Remove the large bowl and place the small bowl upside down and in the center of the sun. Trace.
  4. Cut outside of the sun. Fold it in half and make a small cut in the middle. Unfold it and cut from the middle to the circle. Cut around the circle.
  5. Cut the tissue paper into small pieces. Vary the size, shape or color; variety is more interesting than uniformity.
  6. Cut a piece of wax paper larger than the sun. Squeeze some Mod Podge on the wax paper and spread it over an area larger than the sun with the foam brush.
  7. Lay the pieces of tissue paper on the Mod Podge, overlapping them. Cover the Mod Podge completely.
  8. Brush Mod Podge over the tissue paper with the foam brush and allow it to dry thoroughly.
  9. Decorate the sun and its rays with puffy paint, glitter glue and sequins. Allow to dry.
  10. Place the large bowl on top of the tissue paper and trace it. Cut around the circle, removing excess tissue.
  11. Put a thin line of glue around the edge of the circle. Place the sun over the glue and press. Weigh the sun down with heavy objects until the glue dries.
  12. Punch a hole in one of the rays and pull a string through it. Tie a knot and hang up.
Share Button

CELEBRATE THE SEASONS: SUMMER IS FUN! BANNER

CELEBRATE THE SEASONS: SUMMER IS FUN! BANNER

WHAT IS A BANNER?

A banner is a piece of cloth suspended between two poles and often bearing a design, symbol or slogan. Banners can celebrate the seasons, holidays or bear slogans. The designs in this series of Art Tutorials celebrate summer, spring, winter and fall.

SUMMER IS FUN!

SEASONAL PROJECT: SUMMER IS HERE! BANNER

       SEASONAL PROJECT    

Ages: 5 – 12 years

Time: ½ hour – 1 hour

MATERIALS:

White felt square 36”x 36

Orange Fun Foam*

Yellow Fun Foam

White Fun Foam

Beige Fun Foam

Turquoise Fun Foam

Black Fun Foam

Moss

Black marker


1. Measure and cut the white felt to 14” x 20”. Holding the felt vertically, fold a 1” seam at the top and iron. Fold a second 1” seam and iron again. Glue. The dowel rod will go through this loop.

2. Enlarge the photo of the completed banner (above). Then trace and cut the sun from the yellow Fun Foam, the pail from the orange Fun Foam, the shell from the beige fun Foam, the shovel from the turquoise Fun Foam, and all four colors of Fun Foam for the ball. Finally, cut the sunglasses from the black Fun Foam. Glue the pieces down.

3. Take a small amount of moss and glue it on the top of the pail. Press down firmly while it dries.

4. Use a black marker to draw the sun’s cheeks, smile and nose. Sketch a few lines on the shell to make it look three-dimensional. Also, spell out “Summer Is Fun”!

5. Cut the dowel rod to about 16” x 18”. Insert through the loop at the top of the felt. Cut string to a length that is suitable for hanging. Tie the string to the ends of the dowel rod and hang.

Have a fun summer!

Fun Foam is also called craft foam.

Share Button

CELEBRATE THE SEASONS! Spring is Here! Mobile

CELEBRATE THE SEASONS! Spring is Here! Mobile
SPRING MOBILE

SPRING MOBILE

Ages: 5 – 12 years

Time: ½ hour – 1 hour

MATERIALS:

Construction paper or craft foam in 4 pastel colors

Eraser/ Pencil

One dowel rods cut to 12”

Tacky glue or glue stick

Patterns from the Banners project

Hole puncher

Ball of jute or string or wire

Scissors


  1. Ask an adult to cut the dowel rods so that you have two. Cross them in the middle and tie them tightly with a piece of string or jute or wire. Lay aside.
  2. Select the paper or craft foam or use a combination of papers and craft foam. Trace and cut shapes from the patterns used for the Spring Is Here! Banner. Vary the sizes of the flowers. Add a yellow circle for the center of the daisy.
  3. Poke a hole near the top of the paper or craft foam shapes with a pencil or use a hole puncher. Then, lace a piece of string or jute or wire 6” to 8” in length through the hole at the top of each shape. Poke a hole at the bottom of the flowers and have some of them cascade downward. Tie the shapes to the dowel rods. To balance the mobile, place two or more shapes on each dowel rod and be sure that some of the shapes hang lower (or higher) than some of the others. This is called balancing or making the mobile level. Ask an adult for help if you need it.
  4. Tie a piece of string in the middle of the two dowel rods for hanging. Does your sculpture move? What makes it move? How is this design different from the banner design? What are the differences? What are the similarities?
Share Button

JOY TO THE WORLD BANNER

JOY TO THE WORLD BANNER

CHRISTMAS

As Christianity became the dominant religion in Europe, Christian holidays were held alongside pagan holidays and celebrations.

Christmas has its roots in Yule, the pagan celebration of the winter solstice held in Northern Europe. The ancient Romans also held a winter festival by commemorating the temple of the god Saturn on December 17th. They called it Saturnalia and later extended the holiday festivities from December 17th to December 23rd.

Christmas, celebrated on December 25th, closes the Advent season and begins the twelve days of Christmastide celebrations.

Early Christians adopted pagan customs as well as pagan festivals and celebrations. For example, the Christmas tree is based on the pagan custom of bringing greenery into the house during the winter.

Christians began celebrating Christmas in the 4th century copying the pagans who celebrated the harvest by feasting during the winter solstice. It was a way of livening up the shortest day of the year.

As Christmas became commercialized, various symbols became identified with the holiday: Santa Claus, snow people, angels, pine wreaths, reindeer, stars, horns, the manger, and more.

JOY BANNER PROJECT

JOY TO THE WORLD BANNER


JOY BANNER

Ages: 5 – 12 years     Time: one hour

MATERIALS:

Gold glitter pen                                   white felt square 14” x 20”

Beige pompom                                   Kelly green craft foam sheet.

Beige felt square                                dark green craft foam sheet.

Gold felt square                                  red craft foam sheet.

Red felt square                                   String – double the length of the dowel rod

Dowel rod                                           Pattern (optional)


Measure and trim the white square to 14” x 20”. Place the piece vertically. Make a loop by measuring and folding and ironing a 1” seam. Measure and fold a second 1” seam. Iron and glue the second fold. You will be inserting the dowel rod through this loop.

Trace and cut the shapes using templates or stencils or use the patterns provided below. To create the wreath, cut 21 – 22 holly leaves from the Kelly green craft foam sheet and 9 – 10 holly leaves from dark green craft foam sheet. Glue the leaves in a circular arrangement using the top ¾ of the white felt background. Overlap the leaves as you form the design of the wreath.

Trace and cut the bow and letters from the red craft foam sheet. Glue the letters and the bow to the bottom of the wreath.

Trace and cut the angel’s dress out of the red felt, the horn from the gold felt, the wings and face from the beige felt. Glue these pieces in the center of the wreath.

Glue a little moss to form the angel’s hair just below the halo. Glue pompom to show hands and feet. Using the glitter pen, define the angel’s wings and bow.

Cut the dowel rod to about 16”. Insert through the top loop. Cut string to a suitable length. Tie strings to each end of the dowel rod and hang.

Happy Holidays!

Making banners is fun for the family. You can use the banner ideas described here or you can use them as a springboard for your own ideas and designs.

All you need are some basic supplies and a love of making crafts!

Share Button

CELEBRATE THE SEASONS! Mr. and Mrs. Snow People Winter Mobile!

CELEBRATE THE SEASONS! Mr. and Mrs. Snow People Winter Mobile!
WINTER MOBILE

WINTER MOBILE

Ages: 5 – 12 years

Time: ½ hour – 1 hour

MATERIALS:

Construction paper or Craft Foam in 6 colors

Silver glitter pen

Ball of jute or string or wire

2 dowel rods cut to 12” each Scissors

Tacky glue or glue sticks

Pencil/eraser

hole puncher

Patterns from the Banners project


  1. Ask an adult to cut the dowel rods so that you have two. Cross them in the middle and tie them tightly with a piece of string or jute or wire. Lay aside.
  2. Select the paper or craft foam. You may want to use a combination of papers and craft foam. Trace and cut shapes from the patterns used for the winter banner: Mr. Snow Man and Mrs. Snow Woman. Adorn them with scarves, hats/berets, noses that look like carrots, buttons, and a pipe for Mr. Snow Man. On a separate sheet of craft foam or construction paper, draw snowflakes with the glitter pen. Cut them along with the Snow Man and Woman. Draw eyes and mouth with a black marker.
  3. Poke a hole towards the top of the paper or craft foam shapes with a pencil or use a hole puncher.
  4. Then, lace a piece of string, thread, jute, or wire 6” to 8” in length through the hole at the top of each shape. Tie the shapes to the dowel rods. To balance the mobile, place two or more shapes to each dowel rod and be sure that some of the shapes hang lower (or higher) than some of the others. This is called balancing or making the mobile level. Ask an adult for help.
  5. Tie a piece of string on the ends of the dowel rods and hang it up. Does your sculpture move? What makes it move? How is this design different from the banner design? What are the differences? What are the similarities?
Share Button

CELEBRATE THE SEASONS! Fall Mobile

CELEBRATE THE SEASONS! Fall Mobile
FALL MOBILE

     FALL MOBILE

Ages: 5 – 12 years

Time: ½ hour – 1 hour

MATERIALS:

Construction paper or craft foam in 5 colors for fall: red, yellow, orange, brown, green

2 dowel rods cut to 12” each

Ball of jute or string or wire

Eraser/ Pencil

Hole puncher (optional)

Scissors

Tacky glue or glue stick

Patterns from the Banners project


  1. Ask an adult to cut the dowel rods so that you have two. Cross them in the middle and tie them tightly with a piece of string or jute or wire. Cut another piece to tie on each end when hanging the mobile. Lay aside.
  2. Select craft foam or construction paper in fall colors: orange, yellow and brown. Dark red, purple and dark green also work well for autumn themes. Trace and cut the leaf patterns from the fall banner project. Cut two leaves for each leaf shape. Vary the sizes for more interesting results.
  3. Cut pieces of thread 12” long and even longer depending on how many leaves you will hang. If you are using thread, double it. Lay the thread on the leaves leaving space between them. Vary the amount of space between the leaves or arrange the leaves so that they point in different directions. Apply glue to the back of the leaves.
  4. Take the second leaf and attach it to the back of the first leaf hiding the string or wire. Or thread the needle through a single leaf with the needle and make a loop. Tie the ends.
  5. Hang the leaves from the dowel rods so that the mobile is balanced. Tie a piece of string, jute or wire and tie to the ends of the dowel rods. Hang it up and see the mobile move.
  6. Does your sculpture move? What makes it move? How is this design different from the banner design? Can you list the differences? Can you list the similarities? What is the difference between attaching the leaves on the mobile and attaching the leaves on the banner? What makes the leaves on the mobile three-dimensional?


Share Button

KID’S CRAFTS: Red,White and Blue Banner

KID’S CRAFTS: Red,White and Blue Banner

Fourth of July Banner

Red, White and Blue Banner

Ages: 5 – 12 years

Time: one hour

MATERIALS:

White felt 14” x 18”

Red, white, blue craft foam sheets

Sharp tool like an awl

¼” red, white and blue ribbon

Dowel rod 18”

String – double the length of the dowel rod

Measure and cut white felt to 14” x 20”. Place felt horizontally. Make a loop by measuring and folding and ironing a 1” seam. Measure and fold a second 1” seam. Iron and glue the second fold. You will be inserting the dowel rod through this loop. (This piece of felt should now measure  14” x 16”.)

Using templates or stencils trace the large star pattern and cut one large star out of the white craft foam sheet. Cut 13 smaller stars out of the white craft foam using the smaller star pattern. Trace and cut a large circle out of the blue craft foam sheet. Glue the large star in the center. Arrange the smaller stars around the circle. Make sure that they all face the same way. Lay aside.

Measure and cut 7 stripes ¾” x 16” out of the red craft foam sheet. Arrange the stripes on the banner so that there is a ¾” stripe of white felt showing between them. (Refer to the photo of the banner.) Glue the stripes down and trim if necessary.

Glue the blue circle with the stars in the center of the red and white stripes.

At the bottom of the banner, poke holes every 1” with a sharp tool like an awl. (Small children should let adults do this for them.) Insert the ribbon in the holes, alternating the colors. Pull the ribbon through and tie a knot in the back.

Trim the dowel rod to 18”. Cut a piece of string to a length suitable for hanging. Tie the string to each end of the dowel rod. The first Fourth of July celebration occurred in Philadelphia, PA. Eventually, all the states celebrated the holiday which included parades, picnics, military displays and fireworks.

VARIATION: You can also hang your banner on Memorial Day or Labo

Share Button

How to Make Paper Molas

How to Make Paper Molas


Materials:

Pencil with eraser

Scissors (embroidery scissors work best for cutting out small pieces of paper)

Three pieces of different colored construction paper, memory album paper or craft foam

Glue stick

White glue

Project:

  1. Draw a design on one of the pieces of paper with a pencil. Cut the design out.
  2. Place a second piece of paper under the first. Line up the edges.
  3. Draw smaller design shapes on the second piece of paper.
  4. Pull out the second piece of paper and cut out these smaller shapes.
  5. Place the first piece of paper over the second one and glue them together.
  6. Place these two pieces on top of the third piece of paper and line up the edges.
  7. Glue the third piece into place.
  8. Frame and hang the molas.
Share Button

How to Make a Retablo

How to Make a Retablo


Retablo

Retablo


A retablo is a small oil painting on tin, zinc, copper or wood used in Catholic homes to venerate Catholic saints.

Materials:

6” x 6” oak tag with ½” scored around all four edges

6″ x 5″ oak tag 1/2″ scored on the left and right sides

Yellow construction paper

Yellow crayon or marker

Gold paint (optional)

Paint brush (optional)

5” x 5” construction paper (color of choice)cut into one inch strips

Scraps of construction paper

Black construction paper

Foil papers (optional)

Rulers

Stickers, crayons, pencils, black markers (preferably Sharpies), rubber stamps and ink, etc.

White glue

Scissors

Tape

Matt or utility knife


Project:

  1. Measure ½” around the edges of the 6” X 6” oak tag. Score the edges using a utility knife and ruler. Do not cut all the way through the oak tag.
  2. Cut out the corners, then fold up the edges and tape them to secure them.
  3. To make the doors: measure and cut a piece of oak tag 6” x 5.” Measurements are not always perfect so trim where necessary. Measure ½” on each end of the longest side. Score and fold. Cut in half.
  4. Cut a 2 1/2″ x 3” colored square and cut diagonally to make two triangles.
  5. Decorate the doors and the top triangle piece with gold paint or yellow markers or crayons or glue yellow construction paper.  Tape the 1/2″ edges of the doors on the right and left sides to the retablo.
  6. Cut small construction paper pieces and foil papers into different shapes and glue to the doors and triangle tops. Create a design that reflects you instead of a traditional retablo.
  7. Center and glue the oak tag with the doors on the black construction paper.
  8. Cut 1” x 5″ strips out of the construction paper (any color of choice) and glue into the back of the retablo box.
  9. Draw items of relevance and place them on the shelves or use stickers or glue small objects that mean something to you or use whimsical drawings or objects.
  10. Display the retablo during El Dia de los Muertos or on any day of the year that is special to you.


Share Button

Summer Camp: Windsock

Summer Camp: Windsock
Windsocks

Windsocks


Materials:

One sheet craft foam any color

One bandana any color or design or scrap of fabric (Ribbon is a good substitute)

Ink pen or fabric marker

Additional craft foam in various colors or craft papers in assorted colors

Patterns

Peel ‘n Stick Adhesive tape

Glue

Scissors

Hole punch

  1. Trace and cut patterns provided (below) on to the large craft foam.
  2. Adhere the adhesive tape to the back of the patterns, peel the back off and arrange them on to one side of the craft foam sheets (i.e., use green foam for the leaves, yellow foam for the daisies, etc) or use glue.
  3. Run a line of glue or the adhesive tape down the length of one short edge of the craft foam. Fold down the opposite edge of the craft foam and press to form an oblong windsock.
  4. Cut 1” slits along one edge of the bandanna or fabric and tear to form long strips.
  5. Punch three evenly spaced holes along the edge of the windsock. Insert a strip of fabric or bandanna into each hole. Make a knot to hold the strip in place. Gather the opposite ends of the fabric trips and tie them together into one knot.
  6. Punch evenly spaced holes along the bottom edge of the windsock for the remaining strips of fabric. Or cut small slits and poke the fabric through with the scissors. Place each fabric strip into each hole and knot each to secure in place.

Airports use windsocks to show wind direction and relative wind speed but they are also used for decorative purposes. Windsocks made of paper and silk originated in China and Japan. The ancient Romans used windsocks as military banners.

For more information go to www.ehow.com


Share Button