CHRISTMAS
As Christianity became the dominant religion in Europe, Christian holidays were held alongside pagan holidays and celebrations.
Christmas has its roots in Yule, the pagan celebration of the winter solstice held in Northern Europe. The ancient Romans also held a winter festival by commemorating the temple of the god Saturn on December 17th. They called it Saturnalia and later extended the holiday festivities from December 17th to December 23rd.
Christmas, celebrated on December 25th, closes the Advent season and begins the twelve days of Christmastide celebrations.
Early Christians adopted pagan customs as well as pagan festivals and celebrations. For example, the Christmas tree is based on the pagan custom of bringing greenery into the house during the winter.
Christians began celebrating Christmas in the 4th century copying the pagans who celebrated the harvest by feasting during the winter solstice. It was a way of livening up the shortest day of the year.
As Christmas became commercialized, various symbols became identified with the holiday: Santa Claus, snow people, angels, pine wreaths, reindeer, stars, horns, the manger, and more.
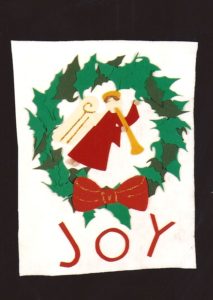
JOY TO THE WORLD BANNER
JOY BANNER
Ages: 5 – 12 years Time: one hour
MATERIALS:
Gold glitter pen white felt square 14” x 20”
Beige pompom Kelly green craft foam sheet.
Beige felt square dark green craft foam sheet.
Gold felt square red craft foam sheet.
Red felt square String – double the length of the dowel rod
Dowel rod Pattern (optional)
Measure and trim the white square to 14” x 20”. Place the piece vertically. Make a loop by measuring and folding and ironing a 1” seam. Measure and fold a second 1” seam. Iron and glue the second fold. You will be inserting the dowel rod through this loop.
Trace and cut the shapes using templates or stencils or use the patterns provided below. To create the wreath, cut 21 – 22 holly leaves from the Kelly green craft foam sheet and 9 – 10 holly leaves from dark green craft foam sheet. Glue the leaves in a circular arrangement using the top ¾ of the white felt background. Overlap the leaves as you form the design of the wreath.
Trace and cut the bow and letters from the red craft foam sheet. Glue the letters and the bow to the bottom of the wreath.
Trace and cut the angel’s dress out of the red felt, the horn from the gold felt, the wings and face from the beige felt. Glue these pieces in the center of the wreath.
Glue a little moss to form the angel’s hair just below the halo. Glue pompom to show hands and feet. Using the glitter pen, define the angel’s wings and bow.
Cut the dowel rod to about 16”. Insert through the top loop. Cut string to a suitable length. Tie strings to each end of the dowel rod and hang.
Happy Holidays!
Making banners is fun for the family. You can use the banner ideas described here or you can use them as a springboard for your own ideas and designs.
All you need are some basic supplies and a love of making crafts!


Share this: