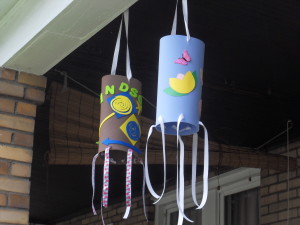
Monthly Archives: June 2015

Summer Camp: Windsock

Summer Camp: Windsock
Windsocks

Windsocks


Materials:

One sheet craft foam any color

One bandana any color or design or scrap of fabric (Ribbon is a good substitute)

Ink pen or fabric marker

Additional craft foam in various colors or craft papers in assorted colors

Patterns

Peel ‘n Stick Adhesive tape

Glue

Scissors

Hole punch

  1. Trace and cut patterns provided (below) on to the large craft foam.
  2. Adhere the adhesive tape to the back of the patterns, peel the back off and arrange them on to one side of the craft foam sheets (i.e., use green foam for the leaves, yellow foam for the daisies, etc) or use glue.
  3. Run a line of glue or the adhesive tape down the length of one short edge of the craft foam. Fold down the opposite edge of the craft foam and press to form an oblong windsock.
  4. Cut 1” slits along one edge of the bandanna or fabric and tear to form long strips.
  5. Punch three evenly spaced holes along the edge of the windsock. Insert a strip of fabric or bandanna into each hole. Make a knot to hold the strip in place. Gather the opposite ends of the fabric trips and tie them together into one knot.
  6. Punch evenly spaced holes along the bottom edge of the windsock for the remaining strips of fabric. Or cut small slits and poke the fabric through with the scissors. Place each fabric strip into each hole and knot each to secure in place.

Airports use windsocks to show wind direction and relative wind speed but they are also used for decorative purposes. Windsocks made of paper and silk originated in China and Japan. The ancient Romans used windsocks as military banners.

For more information go to www.ehow.com


Share Button

Summer Camp: Sgrafitto

Summer Camp: Sgrafitto
Sgrafitto

Sgrafitto

Sgrafitto is an etching technique that uses a pointed tool to scratch through a covered surface to show the art work beneath it.

Materials:

Wax crayons (Do not use black)

India ink or back poster paint

Pointed tool for etching such as a knitting needle or a toothpick

Cardboard or mat board

Brush

  1. Draw and color various abstract shapes on the cardboard or mat board. Make sure to use a heavy hand and leave a thick layer of wax crayon.
  2. Paint the cardboard or mat board with India ink or black poster paint. Allow the surface to dry completely. If the wax crayons show through, you need a second coat of paint or ink. Allow this coat to dry.
  3. Select the pointed tool you will use. You can experiment with different tools on a scrap of cardboard and then decide which one is best for your work of art.
  4. Have an image or design in mind or draw one on sketch paper first. Etch the design directly on the painted cardboard or mat board using various strokes: long, short, or circular going in various directions: horizontal, vertical or diagonal. Etch deeply enough to penetrate the first layer of ink or poster paint.
  5. Frame the sgrafitto and don’t forget to etch your name in the lower right-hand corner.

Inspired by: All-Around-the-House Art and Craft Book by Patricia Z, Wirtenberg

Art Work by Jeffrey J. Bennett


Share Button

Summer Camp: Sponge Painting

Summer Camp: Sponge Painting
Sponge Painting: The Sun

Sponge Painting: The Sun


Materials:

Household sponges in various shapes and sizes (Household sponges found in grocery stores can create interesting patterns and designs.)

Craft paints in various colors

Water jar

Paint palette or paper palette

Printing paper like bond or rice paper or sheets of canvas

Markers or colored pencils.
Project:

  1. Draw a design or picture on a piece of paper and use it as reference for the sponge painting. Or draw directly on the surface that you are going to paint, i.e., a sheet of canvas.
  2. Cut small pieces of the sponge from the larger sponge. To create an abstract design, snip tinier pieces from the divided pieces of the larger sponge.
  3. Squeeze the paints on the palette.
  4. Dampen the sponges and squeeze out the excess water.
  5. Dab the sponge in the paint and dab it on a piece of scrap paper to test the design and the amount of paint needed. A lot of paint on a sponge will create large blobs of color on the paper or canvas.
  6. With the design as reference, dab the paint on to the paper. Do not drag the sponge because that will smear the paint (unless smearing is the effect you want to create).
  7. Remember to wash and rinse the sponge to use again or use a separate sponge for each color.
  8. Continue until you have completed the painting. Add details with a marker or colored pencil when the paint is dry.

NOTE:  In the example above,  the central design was painted first, then the background.

ADDITIONAL PROJECT:

Create a sponge painting on wood or stone.


Inspired by Arts and Crafts Activities Desk Book by Joyce Novis Laskin

Share Button

Intro to Summer Camp: Paper Garland Sign

Intro to Summer Camp: Paper Garland Sign

Materials:

Paper in various colors

Scissors

Pencil/eraser

Ruler or yard stick

Markers

Glue stick

Hole puncher

Pipe cleaners, string, paper twists or similar material

Number stencils or templates (optional)

One chain link fence

  1. Make a sign for your clubhouse or to celebrate the beginning of summer and the end of school. Make a loop for every letter of your sign and for the space between the words. Make a loop at the beginning of your sign which will be blank and a loop for the end of your sign which will also be blank. For example, a sign that says “School is out!” will have 11 loops for the words, one for the exclamation mark, two for the spaces between words and an extra loop at each end. That would be a total of sixteen loops.
  2. Use four or five different colored papers. Measure and cut the colored papers into six or more ½” x 8” strips.
  3. Glue one strip of paper measuring ½” x 8” overlapping the ends. Then glue a strip of paper measuring ½” x 8” through the first loop. Alternate the colors of the paper strips until you have the required number of paper loops forming a garland. Use the photograph for reference.
  4. Next, cut paper rectangles in various colors about 1 1/2” by 3.” Make enough to spell out your message.
  5. Trace a letter on each paper rectangle by using a template, stencil or free hand. Trace any exclamation, question mark or symbol, too.
  6. Punch a hole at the top of each paper rectangle. Punch a hole in the loops. Do not punch holes in the first and last loops and the loops that represent spaces between words.
  7. Cut string or pipe cleaners or similar material and loop it through the holes.
  8. Or use your imagination and glue seeds, glitter, sequins and other decorative objects!
  9. Tie a string through the first and last loops and tie them on to the fence. Don’t forget to add extra loops when you change the message!
Share Button