Tag Archives: patterns

CELEBRATE THE SEASONS! Fall Mobile

CELEBRATE THE SEASONS! Fall Mobile
FALL MOBILE

     FALL MOBILE

Ages: 5 – 12 years

Time: ½ hour – 1 hour

MATERIALS:

Construction paper or craft foam in 5 colors for fall: red, yellow, orange, brown, green

2 dowel rods cut to 12” each

Ball of jute or string or wire

Eraser/ Pencil

Hole puncher (optional)

Scissors

Tacky glue or glue stick

Patterns from the Banners project


  1. Ask an adult to cut the dowel rods so that you have two. Cross them in the middle and tie them tightly with a piece of string or jute or wire. Cut another piece to tie on each end when hanging the mobile. Lay aside.
  2. Select craft foam or construction paper in fall colors: orange, yellow and brown. Dark red, purple and dark green also work well for autumn themes. Trace and cut the leaf patterns from the fall banner project. Cut two leaves for each leaf shape. Vary the sizes for more interesting results.
  3. Cut pieces of thread 12” long and even longer depending on how many leaves you will hang. If you are using thread, double it. Lay the thread on the leaves leaving space between them. Vary the amount of space between the leaves or arrange the leaves so that they point in different directions. Apply glue to the back of the leaves.
  4. Take the second leaf and attach it to the back of the first leaf hiding the string or wire. Or thread the needle through a single leaf with the needle and make a loop. Tie the ends.
  5. Hang the leaves from the dowel rods so that the mobile is balanced. Tie a piece of string, jute or wire and tie to the ends of the dowel rods. Hang it up and see the mobile move.
  6. Does your sculpture move? What makes it move? How is this design different from the banner design? Can you list the differences? Can you list the similarities? What is the difference between attaching the leaves on the mobile and attaching the leaves on the banner? What makes the leaves on the mobile three-dimensional?


Share Button

CROSS STITCHING FUN – SIMPLE WAYS TO GET STARTED

CROSS STITCHING FUN – SIMPLE WAYS TO GET STARTED
Cross Stitch sample

Cross Stitch sample: Hanging Ornament


Cross stitching is a fun way to pass the time and relax. There are several different ways to get started. Whether you decide to buy a cross stitching kit or buy the supplies separately, it is easy to get started.

Start out by making a visit to your local craft store. Many craft stores carry both the premade kits and the separate supplies. Premade kits come in handy because they include the thread, the canvas and the needle as well as step by step instructions. The premade kits come in different styles and projects. Pictures are available as well as more detailed projects such as pillow cases, bibs, blankets and lots more. Prices for the premade kits are wide in range. There are several projects that start as low as $5 ranging up to $100 for more detailed projects.

If you choose to buy the supplies separately, it is a good idea to buy a cross stitch book first. These books usually contain several patterns and specify the materials needed to complete the patterns. Among the materials needed are typically thread, needles, canvas and a hoop to keep the canvas stretched. The hoop makes it easy to cross stitch more accurately, but they are not required.

Follow the directions included in the kit or patterns to achieve the desired outcome. The directions supplied specify the colors used and each has a specific icon that represents the color. Follow these directions to make sure that your picture matches the pattern. There are several different kinds of stitches such as cross stitch, half-stitch and a back-stitch. Each stitch made a certain way, so familiarize yourself with each stitch. Knowing the stitches beforehand will help end any frustration during the sewing.

After you have experience with cross stitching it is possible to develop your own pattern. Do some research and choose a picture to turn into a cross stitch pattern. This is a more complex way of cross stitching so ease and experience count.

After the cross stitch is complete, it is time to frame your work! Buy a nice frame to display your work on the wall or to give away as a gift. Congratulate yourself on a job well done.

Getting started with cross stitch is easy and fun. There are two different methods to get started, buy a premade kit or buy the supplies separately. Craft stores usually carry all the supplies you need to get started, so be sure to visit one and pick the best method for you.

Share Button

An Amazing Quilter

An Amazing Quilter

An Amazing Amish Quilter

I first visited Smicksburg, Pennsylvania on the last day of summer 2016. Smicksburg is a small rural town where a small arts and crafts community coexists with the Amish and other rural folks. The shops are fun to visit: pottery, antiques, dried flowers, yarn and wool, country gifts and a small Heritage museum. Other shops flourish on the periphery of Smicksburg and include an Amish furniture shop, antiques, a country restaurant, a chocolate shop (with more than just chocolate).

I wrote about that first trip (and the second trip) but I didn’t mention the Amish farm that my friend and I passed. We saw the sign by the side of the road: “Quilt repairs.”

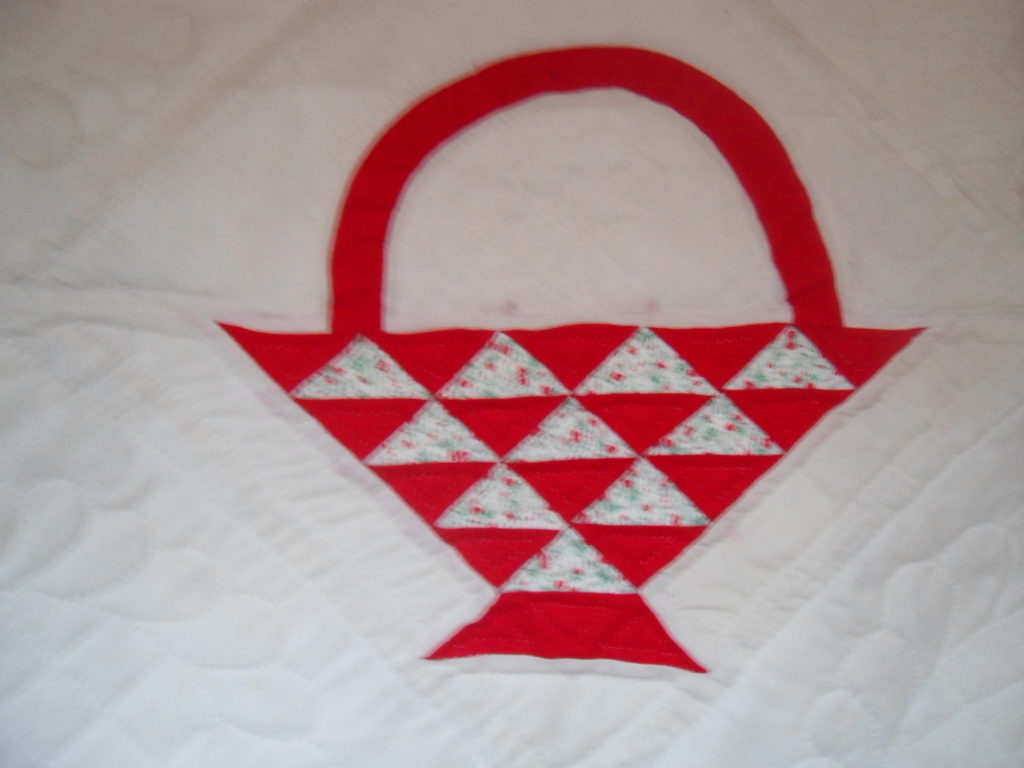
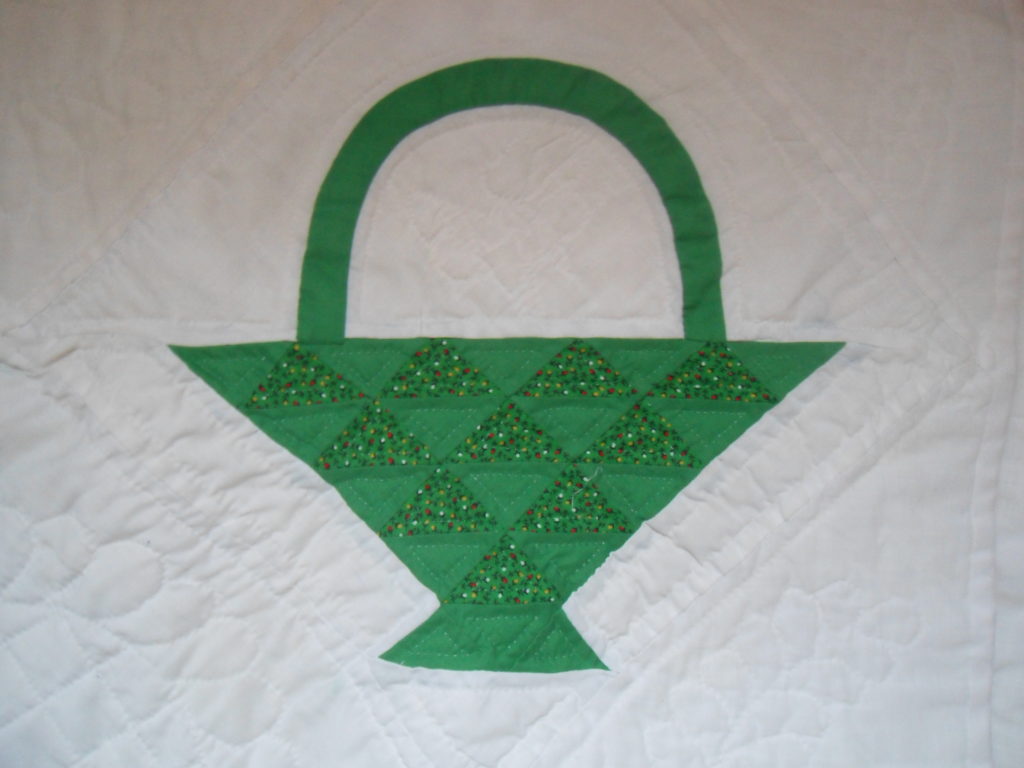
I thought about the handmade basket pattern quilt I bought at the annual antiques show in a mall 18 to 20 years ago (Monroeville Mall, Monroeville, PA). Some of the material had frayed so I put it away hoping to repair it one day.

I knew it would be expensive to fix and finding someone who repairs quilts is like looking for a needle in a haystack. I tried. The closest quilt “repairer” that I had found was a five-hour drive away from Pittsburgh.

On the second rip to Smicksburg, I brought it along thinking I would get an estimate. The fabric had deteriorated even more; in fact, so had the cotton batting between the quilt top and the backing. We stopped at the quilt shop which displayed some of the most beautiful quilts I have ever seen in many different colors and patterns including crazy, log cabin, postage stamp (my favorite) and more.

She has her share of customers, too.

Effie greeted us and explained how long it would take and how much and that cotton doesn’t last. The Amish have switched to cotton blends. So I decided right there and then that I would leave the quilt for Effie to repair. That was in October. She had two other quilts ahead of mine to work on so it would take as until the Christmas holidays or even early January before she could finish it. I plucked down a deposit and wrote my name and address in her guest book.

The Saturday after Thanksgiving, Effie wrote to me that she had finished the quilt.  I picked it up this Saturday, December 10th (again spending the day in Smicksburg browsing and shopping).

Effie is an amazing artist;  the quilt is like new. Not only are the baskets replaced in their original colors (with fresh fabric) but the quilted background was redone like the original.  Effie’s mother told us that Effie used fabric that belonged to her grandmother to repair the baskets that had deteriorated (some of the baskets were in good condition).

We chatted with Effie and her mother for a while. I had never really communicated with the Amish before but it’s no different from speaking to anyone else.  (I once spoke to an Amish buggy driver in Lancaster.) Her mother told us that Effie was named after a beloved aunt.

Effie works by hand, without the benefit of electricity (or running water), a computer to store her patterns and database of customers, or a cell phone to text that the quilt is ready or that she’s running a special for the holidays. We communicated by letter or face-to-face.Their way of life reminds me of the seven months I spent in my father’s village in Cyprus: no running water, electricity, etc.

And the Amish are hardy. In October, Effie and her mother greeted us walking barefoot on the hard ground. Neither wore a coat yesterday and it was not a warm day.

Yesterday, I felt like I was going through a spiritual experience fixing my heirloom quilt!

A Brief History of Quilting

Quilting was first developed in Europe during the Crusades when European soldiers discovered that Turks wore several layers of fabric quilted together under their armor.

In other parts of the world, (China, North Africa, the Middle East, and northern Europe), clothing sometimes featured patchwork stitching. In ancient China, silk was so expensive that when an article of clothing wore out, the silk was cut into pieces and sewn into patchwork clothing. Today, quilting is primarily used on bedspreads, wall hangings, place mats and the like.

A quilt is composed of a top which is made of pieces of fabric cut and sewn into a pattern. Cotton (or polyester or wool) batting is layered between the quilted top and the backing. The three layers are pinned together, the quilted design marked on the top piece and quilted by hand or by machine. The outer edges of the quilt are turned under and sewn with binding.

By the time the early colonists arrived in the New World, quilting was a common way of sewing bedding and clothing. However, only the wealthy owned them. Fabrics were imported from France and England and expensive for the average colonial family.

By the early 19th century, American manufacturing cheaply produced cotton fabrics in various colors and patterns and designs evolved over time: the medallion, crazy pattern, mosaic, and Baltimore Album or Friendship design among others.

In 1972, the Whitney Museum of American art celebrated the history of American quilts with the exhibit, “Abstract Design in American Quilts.” The Bicentennial Celebrations and the growing feminist movement influenced the theme of the exhibit which featured vintage Amish quilts. The exhibit was a success with the public.

Quilts not only became popular to make and/or own, but vintage quilts became quite collectible.

www.britannica.com 

Teague, Ken. Growing Up in Ancient China.  Troll Associates, Eagle Books, 1994.

Share Button

Summer Camp: Windsock

Summer Camp: Windsock
Windsocks

Windsocks


Materials:

One sheet craft foam any color

One bandana any color or design or scrap of fabric (Ribbon is a good substitute)

Ink pen or fabric marker

Additional craft foam in various colors or craft papers in assorted colors

Patterns

Peel ‘n Stick Adhesive tape

Glue

Scissors

Hole punch

  1. Trace and cut patterns provided (below) on to the large craft foam.
  2. Adhere the adhesive tape to the back of the patterns, peel the back off and arrange them on to one side of the craft foam sheets (i.e., use green foam for the leaves, yellow foam for the daisies, etc) or use glue.
  3. Run a line of glue or the adhesive tape down the length of one short edge of the craft foam. Fold down the opposite edge of the craft foam and press to form an oblong windsock.
  4. Cut 1” slits along one edge of the bandanna or fabric and tear to form long strips.
  5. Punch three evenly spaced holes along the edge of the windsock. Insert a strip of fabric or bandanna into each hole. Make a knot to hold the strip in place. Gather the opposite ends of the fabric trips and tie them together into one knot.
  6. Punch evenly spaced holes along the bottom edge of the windsock for the remaining strips of fabric. Or cut small slits and poke the fabric through with the scissors. Place each fabric strip into each hole and knot each to secure in place.

Airports use windsocks to show wind direction and relative wind speed but they are also used for decorative purposes. Windsocks made of paper and silk originated in China and Japan. The ancient Romans used windsocks as military banners.

For more information go to www.ehow.com


Share Button

Banner Designs: Fall Banner

Banner Designs: Fall Banner

WHAT IS A BANNER?

A banner is a piece of cloth suspended between two poles and often bearing a design, symbol or slogan. Banners can celebrate the seasons, holidays or bear slogans. The designs in this series of Art Tutorials celebrate summer, spring, winter and fall.

(For the first tutorial, the Fall Banner, scroll down.)

MATERIALS

Here are some basic supplies that you will need on hand for all the banner designs:

Yardstick iron/ironing board (optional) string

Ball point pen or marker scissors tacky glue

Dowel rods Fun Foam pencil/eraser

Poster board felt or fabric squares paper towels

*Unless indicated otherwise, all felt squares should measure 9” x 12” and all sheets of Fun Foam measure 12’ x 18”.

STUFF TO KNOW

How to copy a pattern: Trace a pattern or object by placing tracing paper on its surface and tracing the design with a pencil. Turn the tracing paper over and blacken the reverse side. Then flip the tracing paper original side up again. Lay the tracing paper on the surface you want the design to transfer on to and trace the outline of the design.

Cutting a Square:

Technique #1: Measure with a ruler the desired size of the square. Draw the outline of the square.

Technique #2: Hold the paper flat and bring the top right corner down to the left edge. Then fold the paper so the edges  line up on the left side. Cut off the extra strip of paper and unfold the square.


BIBLIOGRAPHY

Holz, Loretta. Mobiles You Can Make. New York: Lothrop, Lee and Shepard Company, 1965

Zubrowski, Bernie. Mobiles: Building and Experimenting with Balancing Toys. New York: Morrow Junior Books, 1993.

Constantinides, Marion. Banners! (Unpublished)


FALL BANNER

Fall Banner Design

Ages: 5 – 12 years

Time: ½ hour – 1 hour

MATERIALS:

Yellow felt 36” x 36”

Burgundy felt square

Beige or Brown felt square

Orange felt square

Green felt square

1. Measure and trim yellow felt to 14” x 20”. Holding the felt vertically, fold a 1” seam. Iron. Fold a second 1” seam. Iron again. Glue down with tacky glue. Let dry. This is where you will insert the dowel rod.

2. Using the patterns provided, cut one dark red, one green, and one orange leaf from the two large patterns. Do the same for the two small leaf patterns. Arrange on the yellow felt background in a random pattern (as if the leaves are falling from a tree.)

3. Trace and cut two acorns from the beige Fun Foam. Arrange on the banner. Using a black marker or pain, draw a cross hatch pattern at the top of the acorns. Draw vines down the centers of the leaves, too.

4. Glue the pieces with tacky glue.

5. Cut the dowel rod to about 16” – 18”. Insert through the top loop. Cut the string to a length suitable for hanging. Tie a knot at each end of the dowel rod. Your fall banner is ready to hang in your room!

Share Button