Monthly Archives: September 2020

QUILLING (IT’S NOT QUILTING): COLONIAL QUILLING CRAFT

QUILLING (IT’S NOT QUILTING): COLONIAL QUILLING CRAFT


Quilling

American Colonial Crafts – Quilling with paper


MATERIALS:

Strips of quilling paper 1/8 inches to ½ inches in width

Scissors

Clear glue

Pencil or Q-tip

Colored paper or card stock

Light-weight paper in various colors (optional)

Ruler (optional)


PROJECT:

  1. Purchase quilling paper which comes in a variety of colors. Or using a ruler, measure and mark anywhere 1/8” to ½” at intervals along the length of the lightweight paper. Draw a long line along the marks. Cut and repeat the steps until you have enough strips for a design.
  2. Roll the end of the paper on to the end of a pencil or Q-tip. When you reach the end, loosen a little of the coil so you can easily roll it off the pencil. Add a little glue and finish rolling the coil to keep it from loosening.
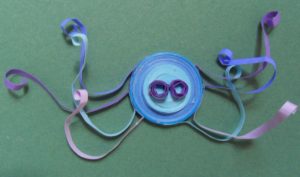
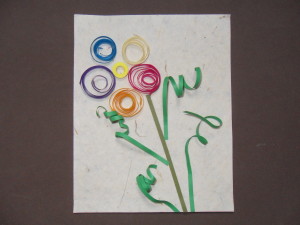
  3. Roll the coils tightly and/or loosely depending on your design. Look at the sample above.
  4. Arrange the coils on the colored paper or card stock creating a design: flowers, butterflies, dragonflies, abstract designs. Quilled paper designs make colorful cards and can be targeted to any theme: Christmas, Halloween, Hannukah, Fourth of July, birthdays, etc. Quilled paper designs can also be framed (without glass) and hung in any room or classroom.
Share Button

QUILLED (IT’S NOT QUILTING): OCTOPUS

QUILLED (IT’S NOT QUILTING): OCTOPUS

QUILLED OCTOPUS

MATERIALS:

(3) 24” strips of light blue quilling paper

(3) 24” strips of medium blue quilling paper

(3) 24” strips of dark blue quilling paper

(4) 3” strips of purple quilling paper

(2) 3” strips of light blue quilling paper

(2) 3” strips of medium blue quilling paper

(2) 3” strips of dark blue quilling paper

Piece of cardstock or board

Glue

Ruler

Begin a tight coil using the light blue paper. When finished, glue the tip. Then wrap the medium blue paper around the light blue paper tightly; glue the tip. Wrap the dark blue paper around the medium blue paper tightly and glue the tip.

For the eyes: tightly coil two of the purple strips separately and glue on to the face of the octopus.

For the tentacles: Bend one end of the strip of paper and make a wide curl with your finger. Curl the opposite end.  Glue the bent end to the octopus. Repeat for the other strips. Place four on either side of the head.

Push the coil out from the center to give the octopus a three-dimensional look.

Glue on card stock or colored cardboard.

Share Button