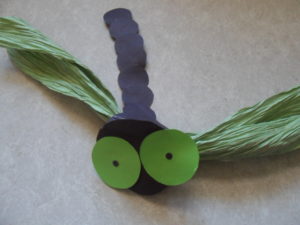
Monthly Archives: July 2018

BUGS & THINGS: Lady Bugs

BUGS & THINGS: Lady Bugs
LADY BUG

LADY BUG

LADY BUGS

Lady bugs are bright red with black spots. Their bright red color tells predators to stay away from lady bugs: they smell bad. Their short legs and antennae help them sense the world around them. There are some 5,000 species of ladybugs. Some of them eat plants and all of them eat plant-eating pests.


Materials:

Craft knife

3” Styrofoam ball

2” Styrofoam ball

Red craft paint (or color of choice)

Black craft paint (or color of choice)

Red felt

Black felt

Patterns (provided)

White glue

2 black pipe cleaners

Scissors


Project:

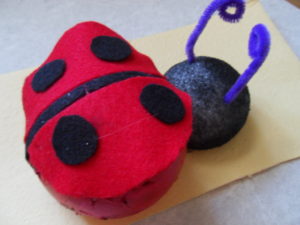
  1. Cut 1/2” from the bottom of a 3” Styrofoam ball. This will enable the lady bug to stand. Cut ¼” from the bottom of the 2” Styrofoam ball.
  2. Paint the Styrofoam ball. Use the traditional red for the body of the lady bug or use a different color. Use your imagination! Paint the 2” head black or use another color.
  3. The patterns provided include a pattern for the wings. Trace the circle on to the red felt and cut. Then cut the circle in half.
  4. There are also patterns for the dots on the lady bug. The dots are usually black but you can use another color for fun. Cut the pattern and trace four dots on the felt. Cut.
  5. Cut the pattern for the stripe down the back. Trace and cut a ¼” x 5” strip of black felt (or color of choice).
  6. Make sure the paint on the Styrofoam ball is dry. Draw a line of glue down the length of the strip and place it along the length the 3” ball.
  7. Place a wing on the 3” ball so it runs along the length of the strip and is even with the top of the strip. Glue only the top edge of the wing to the 3” ball.
  8. Glue the cut end of the 2” ball to the top of the 3’’ ball over the glued ends of the wings.
  9. Cut two 3” lengths of  pipe cleaner and push one end of each stem into the top of the head. Add a little bit of glue to secure the antennae. Bend and shape the ends into little round circles.
  10. Cut a strip of red felt or other color 1 1/2” x 1/8” wide for the mouth. Glue the mouth and the eyes to the face.

.

BIBLIOGRAPHY:

Delano, Marte Ferguson. National Geographic Kids/Butterflies. Washington DC: National Geographic for Kids.

Greensburg, David T. Bugs! NY: Little, Brown and Company. 1997.

Jackson, Demi.  Guess That Animal! Name That Bug! NY: Gareth Stevens Publishing, 2017.

McKissack, Patricia and Frederick. Bugs! Chicago: Children’s Press, 1988.

Parker, Nancy Winslow and Wright, Joan Richards. Bugs. NY: Greenwillow, 1987.

Simon, Seymour. Butterflies. NY: Collins, 2011.

Singer, Marilyn. Caterpillars. Waynesville, MC: Early Light Books, Inc., 2011.

Taylor, Barbara, ed. 1000 Facts on Bugs. NY: Miles Kelly Publishing, 2005.


Share Button

BUGS AND THINGS: Dragonflies

BUGS AND THINGS: Dragonflies

DRAGONFLY


DRAGONFLY

The young dragonfly begins life in the water as a naiad. It feeds on tiny insects and fish. It has long legs which hold the insects it captures while flying. Dragonflies perform good deeds, too: they love to eat mosquitoes. Many dragonfly species live in marshes near rivers and ponds.

Materials:

One sheet lime green stock

Two sheets black construction paper

2 feet Paper Twist (any color)

Circle cutter or template of a circle

Pointed tip scissors

Circle punch

Ruler

White glue

String

Thin gauge wire

Project:

  1. Cut two 3 ½”, three 3”, twelve 1 ½”, six 1”, and eight circle punches.
  2. Cut two ¼” x ½” strips of black construction paper.
  3. Cut two 2” circles out of the lime green paper.
  4. Place on 3” circle and two circle punches aside. Separate the remaining circle and punches into two piles.
  5. To make the body, glue one 3 ½” circle with the edge of one 3” circle, then glue six 1 ½” circles in a row. At the end, glue three circle punches.
  6. Flip the body over and glue a second set of circles over the first row.
  7. For the eyes. Glue two 2” lime green circles on the 3” circle to make the eyes. Glue a black circle punch in the center of each eye.
  8. Attach the head by gluing it to the folds.
  9. To make the wings twist a small piece of wire around the center of the piece of twist. Round off the ends of the twist with scissors. Punch a hole behind the largest body section and insert the wire around the ribbon through this hole to attach the wings to the body. Inset a length of string through this hole to hang the dragonfly.


BIBLIOGRAPHY:

Delano, Marte Ferguson. National Geographic Kids/Butterflies. Washington DC: National Geographic for Kids.

Greensburg, David T. Bugs! NY: Little, Brown and Company. 1997.

Jackson, Demi.  Guess That Animal! Name That Bug! NY: Gareth Stevens Publishing, 2017.

McKissack, Patricia and Frederick. Bugs! Chicago: Children’s Press, 1988.

Parker, Nancy Winslow and Wright, Joan Richards. Bugs. NY: Greenwillow, 1987.

Simon, Seymour. Butterflies. NY: Collins, 2011.

Singer, Marilyn. Caterpillars. Waynesville, MC: Early Light Books, Inc., 2011.

Taylor, Barbara, ed. 1000 Facts on Bugs. NY: Miles Kelly Publishing, 2005.


Share Button

MORE KID’S CRAFTS: Magical Wands

MORE KID’S CRAFTS: Magical Wands

MATERIALS:

Model Magic – white

Dowel rod, 12 – 14 inches in length

White glue

Markers – color(s) of choice

Beads/sequins/glitter/feathers

Curling ribbon – color(s) of choice

Scissors

Brush

PROJECT:

  1. Make a big fist-sized ball of Model Magic. Using a rolling pin or the palm of your hand, flatten out the Model Magic into a rectangle about ¼” thick.
  2. Make sure a corner of the flattened piece comes to a point. Place this piece vertically on the work surface. Squeeze the sides to form points. Refer to the photos above.
  3. Squeeze the bottom of the piece to form two points, too. You should now have five-pointed star: one point at the top, and two on either side and at the bottom.
  4. Color the dowel rod with markers. Insert it between the two points at the bottom.
  5. Push beads, feathers and sequins into the star. Apply glue to the surface of the Model Magic and cover it with glitter. Shake off the excess.
  6. Cut 3 or 4 pieces of curling ribbon 12” long. Tie the ribbon just under the star. Curl the ribbon with one of the scissor blades.

OPTIONAL: Make other shapes!

You now have a magical wand!

Share Button

JUST LOVED READING: My America: An American Spring, Sofia’s Immigrant Diary, Book Three

JUST LOVED READING: My America: An American Spring, Sofia’s Immigrant Diary, Book Three


Just Loved Reading:

My America: An American Spring, Sofia’s Immigrant Diary, Book Three

Middle Grade Novel

Lasky, Kathryn. My America: An American Spring, Sofia’s Immigrant Diary, Book Three. New York: Scholastic, Inc., 2004.

 “Keep, ancient lands, your storied pomp!” cries she

With silent lips. “Give me your tired, your poor,

Your huddled masses yearning to breathe free,

The wretched refuse of your teeming shore.

Send these, the homeless, tempest-tost to me, Not like the brazen giant of Greek fame,

With conquering limbs astride from land to land;

Here at our sea-washed, sunset gates shall stand

A mighty woman with a torch, whose flame

Is the imprisoned lightning, and her name

Mother of Exiles. From her beacon-hand

Glows world-wide welcome; her mild eyes command

The air-bridged harbor that twin cities frame.

I lift my lamp beside the golden door!”

EMMA LAZARUS


In An American Spring, the heroine of Kathryn Lasky’s three-part story of immigrant Sofia Molinari continues to learn about her adopted country.

Sofia is in fifth grade. Miss Burnet, her second grade teacher, is her teacher once again. Sofia’s best friend, Maureen, an immigrant from Ireland, lives with Sofia’s family and attends Miss Burnet’s class, too.

Sofia and Maureen dress up for Halloween (as tomatoes) and celebrate Thanksgiving for the first time. They and Sofia’s older sister, Gabriella, meet the wealthy and elegant Isabella Stewart Gardner when Gabriella is hired to sew a ball gown for her.

Mrs. Gardner is a kind employer. She arranges for a private hospital room when Isabella falls gravely ill and provides the turkey and all the trimmings for the Molinari family’s Thanksgiving.

But most exciting of all is the assignment Miss Burnet gives them in honor of Patriot’s Day (April 19th). Miss Burnet sends her fifth grade class on a Freedom Treasure Hunt. Each child is provided with a map and riddles and has to locate landmarks of the American Revolution. “You see,” Sofia writes in her diary,” Boston is where it all began.”

WHY I LOVED READING THIS BOOK:

Sofia is a spunky character which makes it easy to relate to her and her adventures in America. She is infectiously excited about her experiences in her adopted country whether it’s dressing up as a tomato for Halloween and letting ghost stories get the better of her or visiting Isabella Stewart Gardner’s “palazzo.”

The third series is thin in its plotting –   Gabriella’s illness is the climax of the novel and is followed by the Freedom Treasure Hunt which feels anti-climactic. The lighting of the lantern on Patriot’s Day and Sofia and Maureen’s new found patriotism is the end of Sofia’s story but the reader expects – and wants – more.

Further Reading:

The Statue of Liberty and Ellis Island:

https://www.libertyellisfoundation.org

https://www.libertyellisfoundation.org

Italy:

www.italia.it


Share Button