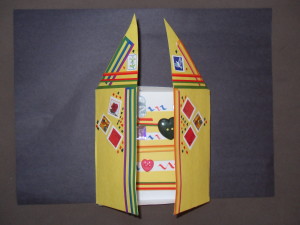
Monthly Archives: December 2015

How to Make Paper Molas

How to Make Paper Molas


Materials:

Pencil with eraser

Scissors (embroidery scissors work best for cutting out small pieces of paper)

Three pieces of different colored construction paper, memory album paper or craft foam

Glue stick

White glue

Project:

  1. Draw a design on one of the pieces of paper with a pencil. Cut the design out.
  2. Place a second piece of paper under the first. Line up the edges.
  3. Draw smaller design shapes on the second piece of paper.
  4. Pull out the second piece of paper and cut out these smaller shapes.
  5. Place the first piece of paper over the second one and glue them together.
  6. Place these two pieces on top of the third piece of paper and line up the edges.
  7. Glue the third piece into place.
  8. Frame and hang the molas.
Share Button

Aztec Sun

Aztec Sun


Aztec Sun

                                 Aztec Sun

Materials:

Two bowls (or plates or other round object)

Ruler

Yellow craft foam

Pencil

Scissors

Tissue paper in four different colors

Wax paper

Mod Podge

Foam brush

Puffy paint

Glue

Hole punch

String


Project:

  1. Center a large bowl upside down on the yellow craft foam.
  2. Draw triangles all around the bowl with a pencil indicating the sun’s rays.
  3. Remove the large bowl and place the small bowl upside down and in the center of the sun. Trace.
  4. Cut outside of the sun. Fold it in half and make a small cut in the middle. Unfold it and cut from the middle to the circle. Cut around the circle.
  5. Cut the tissue paper into small pieces. Vary the size, shape or color; variety is more interesting than uniformity.
  6. Cut a piece of wax paper larger than the sun. Squeeze some Mod Podge on the wax paper and spread it over an area larger than the sun with the foam brush.
  7. Lay the pieces of tissue paper on the Mod Podge, overlapping them. Cover the Mod Podge completely.
  8. Brush Mod Podge over the tissue paper with the foam brush and allow it to dry thoroughly.
  9. Decorate the sun and its rays with puffy paint, glitter glue and sequins. Allow to dry.
  10. Place the large bowl on top of the tissue paper and trace it. Cut around the circle, removing excess tissue.
  11. Put a thin line of glue around the edge of the circle. Place the sun over the glue and press. Weigh the sun down with heavy objects until the glue dries.
  12. Punch a hole in one of the rays and pull a string through it. Tie a knot and hang.
Share Button

How to Make a Hojalata (Mexican Tin Art)

How to Make a Hojalata (Mexican Tin Art)


Hojalata

Hojalata – Kid’s Arts and Crafts

Materials:

Disposable round aluminum pan

Paper like construction paper or bond paper

Permanent markers

Scissors

Newspaper

Puncher to make holes

Jump rings (optional)

String

Pencil or pen


Project:

  1. Cover the work table. Place the disposable aluminum pan on a piece of paper and trace the bottom of the pan so you have a circle.
  2. Sketch a design on a piece of paper: the sun, flowers, cactus, birds, the moon, an animal, etc. (Hojalata artists traditionally draw humorous, religious or cultural objects.) Then draw the design in the circle using a black marker. Cut out the circle and the bottom of the aluminum pan.
  3. Lay the drawing on the aluminum pie pan circle. Pushing hard enough to mark the metal, trace the design with a sharp pencil, pen  or similar tool.
  4. Turn the aluminum pie pan circle over and color in the design with permanent markers.
  5. VARIATION: Cut a fringe around the outside of the pie pan circle when finished coloring.
  6. VARIATION: Use mini-aluminum pie pans.
  7. If you make more than one, you can string them by punching a hole at the top and bottom of each and connecting them with jump rings.
  8. Punch a hole at the top of the pie pan circle, pull a piece of string through and hang the hojalata.  If you hang the hojalatas outdoors, watch them shine in the sun or blow in the wind!  Hang small hojalatas on a holiday tree!


Share Button

How to Make a Retablo

How to Make a Retablo


Retablo

Retablo


A retablo is a small oil painting on tin, zinc, copper or wood used in Catholic homes to venerate Catholic saints.

Materials:

6” x 6” oak tag with ½” scored around all four edges

6″ x 5″ oak tag 1/2″ scored on the left and right sides

Yellow construction paper

Yellow crayon or marker

Gold paint (optional)

Paint brush (optional)

5” x 5” construction paper (color of choice)cut into one inch strips

Scraps of construction paper

Black construction paper

Foil papers (optional)

Rulers

Stickers, crayons, pencils, black markers (preferably Sharpies), rubber stamps and ink, etc.

White glue

Scissors

Tape

Matt or utility knife


Project:

  1. Measure ½” around the edges of the 6” X 6” oak tag. Score the edges using a utility knife and ruler. Do not cut all the way through the oak tag.
  2. Cut out the corners, then fold up the edges and tape them to secure them.
  3. To make the doors: measure and cut a piece of oak tag 6” x 5.” Measurements are not always perfect so trim where necessary. Measure ½” on each end of the longest side. Score and fold. Cut in half.
  4. Cut a 2 1/2″ x 3” colored square and cut diagonally to make two triangles.
  5. Decorate the doors and the top triangle piece with gold paint or yellow markers or crayons or glue yellow construction paper.  Tape the 1/2″ edges of the doors on the right and left sides to the retablo.
  6. Cut small construction paper pieces and foil papers into different shapes and glue to the doors and triangle tops. Create a design that reflects you instead of a traditional retablo.
  7. Center and glue the oak tag with the doors on the black construction paper.
  8. Cut 1” x 5″ strips out of the construction paper (any color of choice) and glue into the back of the retablo box.
  9. Draw items of relevance and place them on the shelves or use stickers or glue small objects that mean something to you or use whimsical drawings or objects.
  10. Display the retablo during El Dia de los Muertos or on any day of the year that is special to you.


Share Button