Tag Archives: crafts for homeschooled children

SUMMER CRAFTS: MEXICAN “BARK” PAINTINGS

SUMMER CRAFTS: MEXICAN “BARK” PAINTINGS
MEXICAN "BARK" PAINTING

MEXICAN “BARK” PAINTING


MEXICAN “BARK” PAINTING

Latin American bark paintings depict birds, fish, sea horses, alpaca, armadillo, and flowers like marigolds, roses, hibiscus and sunflowers. Consider combinations of these objects when creating your design for the bark painting.(See below for a photo of an authentic banana bark painting.)

MATERIALS:

White drawing paper

Tracing paper

Pencil

Permanent black fine-line felt-tipped marker

Acrylic paints – bright colors of choice

Paint brushes

Shellac

Large paint brush

1/4 inch thick piece of plywood 8” x 10”

PROJECT:

  1. Draw your design on a piece of white paper. Then place the tracing paper on the drawing. Trace your design on to the tracing paper.
  2. Blacken the back side of the tracing paper and place it blackened side down on the plywood. Tape it down.
  3. Go over the design on the tracing paper with a pencil by pressing down hard. Remove the tracing paper and go over the lines on the plywood with the black marker. (They should show up on the plywood. Take a peek under one corner of the papers first to see if an impression was made.)
  4. Color the designs with the paints. Make it colorful like real Mexican bark paintings. Allow to dry.
  5. Layer a coat of shellac over the painting to make it shine and to protect it. Mexican bark paintings are colorful. Hang it up in a prominent place.

Mexican Banana Bark Painting

MEXICAN BANANA BARK PAINTING

Share Button

CELEBRATE THE SEASONS: SPRING IS HERE! BANNER

CELEBRATE THE SEASONS: SPRING IS HERE! BANNER

WHAT IS A BANNER?

A banner is a piece of cloth suspended between two poles and often bearing a design, symbol or slogan. Banners can celebrate the seasons, holidays or bear slogans. The designs in this series of Art Tutorials celebrate summer, spring, winter and fall.

SPRING IS HERE! BANNER

SPRING IS HERE! BANNER

Ages: 5 – 12 years

Time: ½ hour – 1 hour

MATERIALS:

White felt 36” x 36”

Green Fun Foam

Pink Fun Foam Pink Fun Foam

Blue Fun Foam

1. Measure and trim white felt to 14” x 20”. Place the piece vertically in front of you. Measure and fold a 1” seam at the top and iron. Fold another 1” seam. Iron and glue the second fold. The dowel rod will go through this loop.

2. Enlarge the photo of the completed banner above. Then trace and cut the flower shapes: yellow Fun Foam for one tulip and one daisy; pink for the second tulip and daisy; blue for the three morning glories; pink for the butterfly and green for the stems and leaves. (NOTE: The daisy and the tulip have different leaves.)

3. Cut one small yellow circle for the center of the pink daisy and one small pink circle for the yellow daisy.

4. Glue all the pieces, scattering the shapes randomly to create a cascading effect. Avoid placing two flowers of the same color next to each other.

5. Draw the centers of the morning glories with a black marker. Add antennae to the butterfly and dots in its center.

6. Cut the dowel rod like the other ones, insert, tie the string to the ends of the dowel rod and han

Share Button

RECYCLED CRAFT: Funky Valentines

RECYCLED CRAFT: Funky Valentines

Funky Recycled Valentines

Materials:

Paper in pink, red, purple, white

Greeting cards or images downloaded from the Internet

Lace Paper doilies

Sequins

Glitter

Pearls

Seeds

Beads

Stickers

Scissors

Glue stick

White glue

Heart-shaped cookie cutters, templates, stencils or the patterns provided below

String or yarn

Markers or colored pencils

  1. Gather greetings cards that you no longer want and cut out shapes that are traditional for a Valentine’s Day theme: flowers, birds, kittens, hearts, puppies, etc. Or download images or clip art from a free program on the Internet.
  2. Using the heart patterns provided or a heart-shaped cookie cutter(s) or template(s) or stencil(s), trace and cut the heart out of colored paper. Use the largest pattern or cookie cutter or stencil for the main part of the valentine. Make more than one valentine and use papers of various colors. Trace and cut hearts of smaller sizes, too.
  3. Glue sequins, images from the greeting cards, small heart-shapes, etc in a pleasing design on the valentine.
  4. Using markers or colored pencils, write a message: “Happy Valentine’s Day!” or any other message suitable for the holiday
  5. Optional: Glue string or yarn on the back of the valentine and hang it up or give it to a friend of your choice.

VARIATION: MAKE A FUNKY RECYCLED VALENTINE POUCH

Create two cards of the same size. Decorate. Glue the two sides but keep the top open. Punch two holes in the center of the heart at the top. Cut a piece of ribbon or string long enough for hanging or carrying. Pass the ribbon or string through the hole and make a knot. Pass the ribbon through the other hole making another knot. You now have a pouch for holding your valentines!

HAPPY VALENTINE’S DAY!

Share Button

Picture Book Month: Groovy Buttons!!

Picture Book Month: Groovy Buttons!!
Groovy Buttons

Groovy Buttons

Read: Pete the Cat and His Four Groovy Buttons by Eric Litwin.

“Pete the Cat puts on his favorite shirt with four, big, colorful, round, groovy buttons.”

But one by one, the buttons pop off and roll away. He realizes that he doesn’t have any buttons on his favorite shirt:

4 – 1 = 3

3 – 1 = 2

2 – 1 =1

1 – 1 = 0

Pete the Cat’s button less shirt opens up and what does he see? His belly button!

What can you do with your buttons?

Project:

Use buttons to decorate…anything! Use your imagination!

List of things to decorate with buttons:

Journal cover

T-shirt

Sneakers

Picture frame

Sunglasses

Book bag or any kind of bag

Materials:

Glue

Lots of buttons

Needle and thread (if you know how to sew)


Alternative Project: Make your own buttons

Materials:

Modeling clay in different colors

Pencil

Make small balls and flatten them. Poke four holes in the center with the pencil. What will you do with your handmade buttons?


*copyright Art work by Marion Constantinides 2015

Share Button

How to Make Paper Molas

How to Make Paper Molas


Materials:

Pencil with eraser

Scissors (embroidery scissors work best for cutting out small pieces of paper)

Three pieces of different colored construction paper, memory album paper or craft foam

Glue stick

White glue

Project:

  1. Draw a design on one of the pieces of paper with a pencil. Cut the design out.
  2. Place a second piece of paper under the first. Line up the edges.
  3. Draw smaller design shapes on the second piece of paper.
  4. Pull out the second piece of paper and cut out these smaller shapes.
  5. Place the first piece of paper over the second one and glue them together.
  6. Place these two pieces on top of the third piece of paper and line up the edges.
  7. Glue the third piece into place.
  8. Frame and hang the molas.
Share Button

Intro to Summer Camp: Paper Garland Sign

Intro to Summer Camp: Paper Garland Sign

Materials:

Paper in various colors

Scissors

Pencil/eraser

Ruler or yard stick

Markers

Glue stick

Hole puncher

Pipe cleaners, string, paper twists or similar material

Number stencils or templates (optional)

One chain link fence

  1. Make a sign for your clubhouse or to celebrate the beginning of summer and the end of school. Make a loop for every letter of your sign and for the space between the words. Make a loop at the beginning of your sign which will be blank and a loop for the end of your sign which will also be blank. For example, a sign that says “School is out!” will have 11 loops for the words, one for the exclamation mark, two for the spaces between words and an extra loop at each end. That would be a total of sixteen loops.
  2. Use four or five different colored papers. Measure and cut the colored papers into six or more ½” x 8” strips.
  3. Glue one strip of paper measuring ½” x 8” overlapping the ends. Then glue a strip of paper measuring ½” x 8” through the first loop. Alternate the colors of the paper strips until you have the required number of paper loops forming a garland. Use the photograph for reference.
  4. Next, cut paper rectangles in various colors about 1 1/2” by 3.” Make enough to spell out your message.
  5. Trace a letter on each paper rectangle by using a template, stencil or free hand. Trace any exclamation, question mark or symbol, too.
  6. Punch a hole at the top of each paper rectangle. Punch a hole in the loops. Do not punch holes in the first and last loops and the loops that represent spaces between words.
  7. Cut string or pipe cleaners or similar material and loop it through the holes.
  8. Or use your imagination and glue seeds, glitter, sequins and other decorative objects!
  9. Tie a string through the first and last loops and tie them on to the fence. Don’t forget to add extra loops when you change the message!
Share Button

Kid’s Crafts: St. Patrick’s Day Banner

Kid’s Crafts: St. Patrick’s Day Banner

KID’S CRAFTS: ST. PATRICK’S DAY

March 17th is the feast day of St. Patrick, patron saint of Ireland. No one knows exactly when St. Patrick was born although historians believe that he was born in Britain. We do know that his real name was Succat and when he was sixteen years old, Irish pirates attacked his family’s estate and kidnapped Patrick,. The pirates forced him to live as a herdsman in somewhere in Ireland. During this time, he became a devout Christian and began to see visions. After six years of enslavement, his visions told him to escape.

He returned to his family but later, fled for the northern coast of Gaul where he became a priest. His course of study lasted 15 years and when it ended, he returned to Ireland, and eventually became Bishop of Ireland.

Symbols associated with St. Patrick’s Day include the leprechaun and the shamrock.  Leprechauns are a race of elves who gave their gold to anyone who could catch them. The shamrock became the national symbol of Ireland because St. Patrick used its three leaves to explain the idea of the Holy Trinity to the Irish people. This was St. Patrick’s way of incorporating Irish customs and beliefs into his teachings of Christianity.

ST. PATRICK'S DAY BANNER PROJECT0001


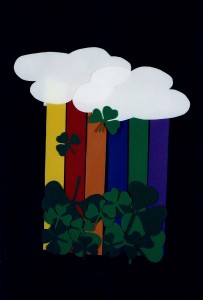
ST. PATRICK’S DAY RAINBOW

Ages: 5 – 12 years

Time: one hour

MATERIALS:

Kelly Green craft foam sheet

Purple craft foam sheet

Dark Green craft foam sheet

Orange craft foam sheet

White craft foam sheet

Blue craft foam sheet

Red craft foam sheet

Dowel rod 20”

Yellow craft foam sheet

String – double the length of the dowel rod

Using templates or stencils (or enlarge the patterns provided below ) trace and cut two clouds out of the white craft foam sheet.  Place one cloud slightly lower than the other and so that they partly overlap each other. Glue. Trace and cut 3 small, 2 medium, and 2 large shamrocks out of the dark green craft foam sheet. Trace and cut 3 small, 2 medium, and 2 large shamrocks out of the Kelly Green craft foam sheet.

Arrange the large shamrocks in a random pattern on the bottom part of the banner and glue. Place one small Kelly Green shamrock and one small dark green shamrock aside. Arrange the rest of the shamrocks so that they  overlap the dark green shamrocks, etc., and glue the pieces. Glue the two shamrocks that you laid aside so that they appear to tumble from the clouds. Avoid centering them on the design because the design will look more interesting if the shamrocks are scattered to the left and right of the design.

Cut three strips 8” x 1 1/2” out of the white craft foam sheet. Glue the ends of each strip so that they form a loop. When the loops are dry, glue the loops to the back of the banner. Insert the dowel rod through these loops and hang your banner for St. Patrick’s Day.

Erin go bragh! (Ireland forever!)

VARIATION: The rainbow in the design reaches for a pot of gold. Where does your rainbow go and how far? Try making your own banner design using four-leaf clovers.


Cloud pattern

Pattern Cloud St. Pat’s Day Banner
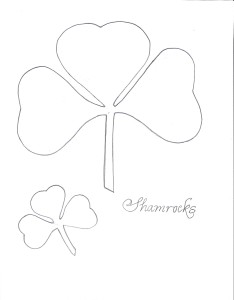
Patterns for two shamrocks

Shamrocks Pattern

Share Button