BEES
BEES
Bees are flying vegetarian insects that collect pollen and nectar. While many bees are black and yellow, some are all black and generally measure one half to three fourth of an inch in length. There are many different kinds of bees: honey bees, carpenter bees and bumble bees among others. Wasps and hornets resemble and can be mistaken for bees, too.
Materials:
Styrofoam egg
6 chenille stems
White glue
Black paint
Paint brush
Yellow felt or yellow paper
Small wiggle eyes
Small Styrofoam ball (must be smaller than the egg)
Scissors
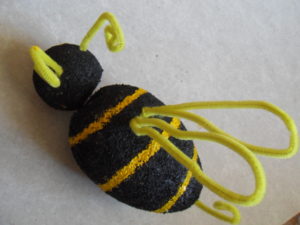
Project:
- Cut ¼” from one side of a Styrofoam egg so the Styrofoam can stand on its side.
- Paint the egg and a 1 12” Styrofoam ball black.
- Cut ¼” from one end of the ball. Glue the head on the wider end of the egg.
- Cut strips of yellow felt and glue them on the back of the egg at intervals so you have alternate stripes of black and yellow. Optional: paint the stripes with yellow paint.
- Cut two 3” chenille stems for the antenna; cut two 11” chenille stems for the wings and one 1 1/2” chenille stem for the tail.
- Shape the 11” stems into hearts and twist the ends together. Cut small slits or poke holes into the sides of the egg. You may need a utility knife and the help of an adult in order to do this. Push the ends into the sides of the body of the bee. Apply glue into those holes to secure if needed.
- Push the tail into the narrow end of the body; add a little glue into that hole, too. Push the antennae into the top of the head; secure with glue. Bend and curl the tops.
- Glue eyes on to the face. Optional: paint two eyes with yellow paint.
BIBLIOGRAPHY:
Delano, Marte Ferguson. National Geographic Kids/Butterflies. Washington DC: National Geographic for Kids.
Greensburg, David T. Bugs! NY: Little, Brown and Company. 1997.
Jackson, Demi. Guess That Animal! Name That Bug! NY: Gareth Stevens Publishing, 2017.
McKissack, Patricia and Frederick. Bugs! Chicago: Children’s Press, 1988.
Parker, Nancy Winslow and Wright, Joan Richards. Bugs. NY: Greenwillow, 1987.
Simon, Seymour. Butterflies. NY: Collins, 2011.
Singer, Marilyn. Caterpillars. Waynesville, MC: Early Light Books, Inc., 2011.
Taylor, Barbara, ed. 1000 Facts on Bugs. NY: Miles Kelly Publishing, 2005.
For more information about honey bees and bumble bees: https://www.mnn.com
Like this:
Like Loading...