Tag Archives: arts and crafts for homeschooled kids

OUR IMAGINATIONS: HAVE A TOO COOL DAY!

OUR IMAGINATIONS: HAVE A TOO COOL DAY!
TOO COOL SUNGLASS

TOO COOL SUNGLASSES

Read Pete the Cat and His Magic Sunglasses by Kimberly and James Dean.

“Pete the Cat did not feel happy. Pete had never, ever, ever, ever been grumpy before. Pete had the blue cat blues.”

Grumpy Toad usually was grumpy but on the day he met Pete the Cat, he was wearing cool, blue, magic sunglasses which made him look at everything in a new way.

When Pete the Cat tried them on, he saw the world in a whole new way, too.

Walking along with his new attitude, Pete the Cat ran into his friends, Squirrel, Turtle and Alligator and lent them his cool, blue, magic sunglasses. They saw the world in a whole new way just like Pete the Cat and Grumpy Toad!

Isn’t that cool?

Then Pete the Cat fell and cracked his cool, blue, magic sunglasses.

What would he do without them?

The Wise Old Owl told him the truth: Pete the Cat didn’t need his cool, blue, magic sunglasses to see the world in a new way. “Just remember to look for the good in every day,” the Wise Old Owl told him.

Pete the Cat looks all around him and exclaimed, “Too cool!”
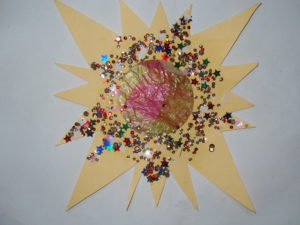
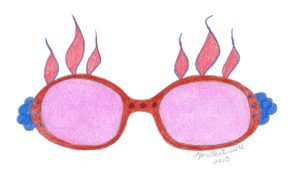
Project:

Decorate a pair of sunglasses to brighten your day like Pete the Cat and his friends.

Materials:

Sunglasses*

Strong glue like gorilla glue

Sequins

Paint in squeeze tubes or bottles

Glitter

Make your sunglasses the coolest ever – you don’t have to paint your glasses blue like Pete the Cat’s! You can paint them any color or design.

*Remember: if you paint the lenses, you won’t be able to see through them!

 Additional Reading:
Lizzie Logan Wears Purple Sunglasses by Eileen Spinelli


Share Button

OUR IMAGINATIONS: A TALE OF TWO UMBRELLAS II:YELLOW POLKA DOT UMBRELLA

OUR IMAGINATIONS: A TALE OF TWO UMBRELLAS II:YELLOW POLKA DOT UMBRELLA

Read: The Yellow Umbrella by Caitlin Dundon

A little boy and his mother are hurrying to school and work. It is a rainy day and they are almost late. The little boy spots a yellow “umbrellow” in the gutter. “Umbrella,” his mother corrects him and hurries him along.

A gust of wind blows his mother’s black umbrella inside out and it breaks.

When they reach his school, the little boy sees all kinds of umbrellas: red ones, blue ones,  orange ones, umbrellas with polka dots and “shapes of all kinds.” There are “even ones with Mickey Mouses.” When his mother picks him up at the end of the school day, she has a surprise for him.

Project: Paint an old umbrella yellow (or any color you wish) and/or decorate it with dots or stripes or Mickey Mouses!

Materials:

An old umbrella

Glue

Beads

Markers

Sequins

Buttons

Silk flowers

Ribbons

Stencils

Paint in squeeze bottles

Stickers

Additional Reading:

The Umbrella by Jan Brett

The Umbrella Day by Nancy Evans

Umbrella by Taro Yashima

*Copyright Art work by Marion Constantinides 2015

Share Button

SUMMER CRAFTS: HOW TO MAKE PAPER MOLAS

SUMMER CRAFTS: HOW TO MAKE PAPER MOLAS

Materials:

Pencil with eraser

Scissors (embroidery scissors work best for cutting out small pieces of paper)

Three pieces of different colored construction paper, memory album paper or craft foam

Glue stick

White glue

Project:

  1. Draw a design on one of the pieces of paper with a pencil. Cut the design out.
  2. Place a second piece of paper under the first. Line up the edges.
  3. Draw smaller design shapes on the second piece of paper.
  4. Pull out the second piece of paper and cut out these smaller shapes.
  5. Place the first piece of paper over the second one and glue them together.
  6. Place these two pieces on top of the third piece of paper and line up the edges.
  7. Glue the third piece into place.
  8. Frame and hang the molas.
Share Button

SUMMER CRAFTS: OJO DE DIOS (GOD’S EYE)

SUMMER CRAFTS: OJO DE DIOS (GOD’S EYE)

OJO DE DIOS (GOD’S EYE)

What is an Ojo de Dios? The indigenous peoples of the Americas originally used them as an object of worship. Today the Ojo de Dios or Eye of God is also used as a decoration.

OJO DE DIOS (GOD'S EYE)

OJO DE DIOS (GOD’S EYE)

Materials:

Chop sticks or dowel rods (12” in length)

Yarn in assorted colors

Scissors

White glue

  1. Cross the chopsticks or dowel rod in the center. Pick a color for the center of the God’s Eye. Tie securely with the end of the yarn.
  2. Loop the yarn a couple of times to secure it further.
  3. Holding the center of the sticks, wrap the yarn under and around one of the sticks a few times. Make sure the sticks don’t show by pushing the yarn together on the stick. Pull snugly.
  4. Pull the yarn to the next stick. Wrap it under and around.
  5. Continue to wrap the yarn from stick to stick by wrapping under the sticks.
  6. If you choose to change colors, tie the yarn to a stick and cut off the excess. Tie on a second yarn.
  7. Continue to wrap until the sticks are almost covered. Make the final wrap and tie the yarn to the stick. You will need extra yarn so cut this piece about 5 “– 6” from the knot.
  8. Place a small amount of glue on the end of the stick. Wrap the end of the yarn over the glue, covering the entire end of the stick. Snip any excess yarn.
  9. Make a loop. Tie it to the opposite end of the stick and hang.

TIP: Small God’s Eyes make great Christmas tree and/or window ornaments. Pencils or short thin dowel rods can be used to make smaller Ojo de Dios ornaments.

Share Button

SUMMER CRAFTS: AZTEC SUN

SUMMER CRAFTS: AZTEC SUN
Aztec Sun

Aztec Sun

Materials:

Two bowls (or plates or other round object)

Ruler

Yellow craft foam

Pencil

Scissors

Tissue paper in four different colors

Wax paper

Mod Podge

Foam brush

Puffy paint

Glue

Hole punch

String


Project:

  1. Center a large bowl upside down on the yellow craft foam.
  2. Draw triangles all around the bowl with a pencil indicating the sun’s rays.
  3. Remove the large bowl and place the small bowl upside down and in the center of the sun. Trace.
  4. Cut outside of the sun. Fold it in half and make a small cut in the middle. Unfold it and cut from the middle to the circle. Cut around the circle.
  5. Cut the tissue paper into small pieces. Vary the size, shape or color; variety is more interesting than uniformity.
  6. Cut a piece of wax paper larger than the sun. Squeeze some Mod Podge on the wax paper and spread it over an area larger than the sun with the foam brush.
  7. Lay the pieces of tissue paper on the Mod Podge, overlapping them. Cover the Mod Podge completely.
  8. Brush Mod Podge over the tissue paper with the foam brush and allow it to dry thoroughly.
  9. Decorate the sun and its rays with puffy paint, glitter glue and sequins. Allow to dry.
  10. Place the large bowl on top of the tissue paper and trace it. Cut around the circle, removing excess tissue.
  11. Put a thin line of glue around the edge of the circle. Place the sun over the glue and press. Weigh the sun down with heavy objects until the glue dries.
  12. Punch a hole in one of the rays and pull a string through it. Tie a knot and hang up.
Share Button

SUMMER CRAFTS: HOJALOTA

SUMMER CRAFTS: HOJALOTA

What is hojalata? A hojalata is Mexican tin art used to create ornate and often practical objects like boxes or hangings or candelabras and more.


HOJALOTA

HOJALOTA


Materials:

Disposable round aluminum pan

Paper

Permanent markers (Optional: use paints specifically for metal, brushes and a water container)

Scissors

Newspaper

Puncher to make holes

Jump rings

String


Project:

  1. Cover the work table. Place the disposable aluminum pan on a piece of colored paper and trace the bottom of the pan so you have a circle.
  2. Sketch a design on a piece of paper: the sun, flowers, cactus, birds, the moon, an animal, etc. (Traditionally, humorous or religious or cultural objects are drawn by hojalata artists.) Then draw the design in the circle using a black marker. Cut out the circle and the bottom of the aluminum pan.
  3. Lay the drawing on the aluminum pie pan circle. Pushing hard enough to mark the metal, trace the design with a sharp pencil or similar tool.
  4. Turn the aluminum pie pan circle over and color in the design with permanent markers.
  5. Punch a hole at the top of the pie pan circle, pull a piece of string through and hang the hojalata.
  6. If you make more than one, you can string them by punching a hole at the top and bottom of each and connecting them with jump rings.
  7. Loop a piece of string through the hole of the top hojalata and hang. If you hang the hojalatas outdoors, watch them shine in the sum or blow in the wind!


Share Button

Art Project for Kids: Sponge Painting

Art Project for Kids: Sponge Painting

Sponge Painting: The Sun

SPONGE PAINTING: THE SUN

Materials:

Household sponges in various shapes and sizes (Household sponges found in grocery stores can create interesting patterns and designs.)

Craft paints in various colors

Water jar

Paint palette or paper palette

Printing paper like bond or rice paper or sheets of canvas

Markers or colored pencils.

Project:

  1. Draw a design or picture on a piece of paper and use it as reference for the sponge painting. Or draw directly on the surface that you are going to paint, i.e., a sheet of canvas.
  2. Cut small pieces of the sponge from the larger sponge. To create an abstract design, snip tinier pieces from the divided pieces of the larger sponge.
  3. Squeeze the paints on the palette.
  4. Dampen the sponges and squeeze out the excess water.
  5. Dab the sponge in the paint and dab it on a piece of scrap paper to test the design and the amount of paint needed. A lot of paint on a sponge will create large blobs of color on the paper or canvas.
  6. With the design as reference, dab the paint on to the paper. Do not drag the sponge because that will smear the paint (unless smearing is the effect you want to create).
  7. Remember to wash and rinse the sponge to use again or use a separate sponge for each color.
  8. Continue until you have completed the painting. Add details with a marker or colored pencil when the paint is dry.

NOTE:  In the example above, the central design was painted first, then the background.

ADDITIONAL PROJECT:

Create a sponge painting on wood or stone.

Inspired by Arts and Crafts Activities Desk Book by Joyce Novis Laskin

Share Button

EASTER EGG BANNER

EASTER EGG BANNER


EASTER EGG BANNER PROJECT

           EASTER EGG BANNER PROJECT

EASTER EGG BANNER

Ages: 5 – 12 years

Time: one hour

MATERIALS:

Pink craft foam sheet

Blue craft foam sheet

Yellow craft foam sheet

Yellow felt square 14” x 20”

Dowel rod 18”

String – double the length of the dowel rod

Measure and cut the yellow felt square to 14” x 20” and place it vertically. Make a loop by measuring and folding a 1” seam and iron. Measure and fold a second 1” seam. Iron and glue the second fold. You will be inserting the dowel

rod through this loop. (This felt piece should now measure  14”x18”.)

Using templates or stencils trace and cut a large egg from the pink craft foam sheet. Glue it on the center of the yellow felt piece. Cut the double cross pattern, 5 small eggs, six small petals, and 4 large petals out of the blue craft foam sheet. Cut six small petals and 4 large petals from the yellow craft foam sheet. Cut 5 small eggs and 2 tiny circles from the pink craft foam sheet.

Glue the double cross on the large egg. Place 4 large yellow petals near the center of the top cross. Glue a pink dot in the center of the cross. Arrange 6 blue petals near the top and sides of the cross. Glue 4 large blue petals near the intersection at the bottom of the cross. Glue a pink dot in the center of the bottom cross. Arrange 6 small yellow petals near the bottom and sides of the cross and glue. Glue small blue and pink eggs in a random pattern around the central egg.

Cut the dowel rod to about 18”. Insert a loop at the top. Cut the string to a length suitable for hanging. Tie the string to the ends of the dowel rod. Decorate your home by hanging the Easter Egg Banner from a window, on a wall or door.

VARIATION: What other symbols have special meaning to you? Use them in your own Easter Egg Design.

Share Button

Summer Camp: Sponge Painting

Summer Camp: Sponge Painting
Sponge Painting: The Sun

Sponge Painting: The Sun


Materials:

Household sponges in various shapes and sizes (Household sponges found in grocery stores can create interesting patterns and designs.)

Craft paints in various colors

Water jar

Paint palette or paper palette

Printing paper like bond or rice paper or sheets of canvas

Markers or colored pencils.
Project:

  1. Draw a design or picture on a piece of paper and use it as reference for the sponge painting. Or draw directly on the surface that you are going to paint, i.e., a sheet of canvas.
  2. Cut small pieces of the sponge from the larger sponge. To create an abstract design, snip tinier pieces from the divided pieces of the larger sponge.
  3. Squeeze the paints on the palette.
  4. Dampen the sponges and squeeze out the excess water.
  5. Dab the sponge in the paint and dab it on a piece of scrap paper to test the design and the amount of paint needed. A lot of paint on a sponge will create large blobs of color on the paper or canvas.
  6. With the design as reference, dab the paint on to the paper. Do not drag the sponge because that will smear the paint (unless smearing is the effect you want to create).
  7. Remember to wash and rinse the sponge to use again or use a separate sponge for each color.
  8. Continue until you have completed the painting. Add details with a marker or colored pencil when the paint is dry.

NOTE:  In the example above,  the central design was painted first, then the background.

ADDITIONAL PROJECT:

Create a sponge painting on wood or stone.


Inspired by Arts and Crafts Activities Desk Book by Joyce Novis Laskin

Share Button