Tag Archives: felt banner craft

EASTER EGG BANNER

EASTER EGG BANNER


EASTER EGG BANNER PROJECT

           EASTER EGG BANNER PROJECT

EASTER EGG BANNER

Ages: 5 – 12 years

Time: one hour

MATERIALS:

Pink craft foam sheet

Blue craft foam sheet

Yellow craft foam sheet

Yellow felt square 14” x 20”

Dowel rod 18”

String – double the length of the dowel rod

Measure and cut the yellow felt square to 14” x 20” and place it vertically. Make a loop by measuring and folding a 1” seam and iron. Measure and fold a second 1” seam. Iron and glue the second fold. You will be inserting the dowel

rod through this loop. (This felt piece should now measure  14”x18”.)

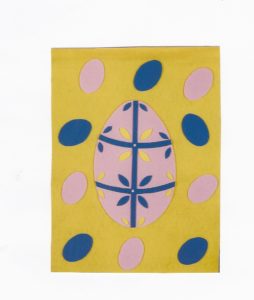
Using templates or stencils trace and cut a large egg from the pink craft foam sheet. Glue it on the center of the yellow felt piece. Cut the double cross pattern, 5 small eggs, six small petals, and 4 large petals out of the blue craft foam sheet. Cut six small petals and 4 large petals from the yellow craft foam sheet. Cut 5 small eggs and 2 tiny circles from the pink craft foam sheet.

Glue the double cross on the large egg. Place 4 large yellow petals near the center of the top cross. Glue a pink dot in the center of the cross. Arrange 6 blue petals near the top and sides of the cross. Glue 4 large blue petals near the intersection at the bottom of the cross. Glue a pink dot in the center of the bottom cross. Arrange 6 small yellow petals near the bottom and sides of the cross and glue. Glue small blue and pink eggs in a random pattern around the central egg.

Cut the dowel rod to about 18”. Insert a loop at the top. Cut the string to a length suitable for hanging. Tie the string to the ends of the dowel rod. Decorate your home by hanging the Easter Egg Banner from a window, on a wall or door.

VARIATION: What other symbols have special meaning to you? Use them in your own Easter Egg Design.

Share Button

Kid’s Crafts: Mr. and Mrs. Snowman Winter Banner

Kid’s Crafts: Mr. and Mrs. Snowman Winter Banner


Winter Banner Design

Mr. and Mrs. Snowman Winter Banner

Ages: 5 – 12 years

Time: ½ hour

MATERIALS:

blue felt square 36” x 36”

black Fun Foam white Fun Foam

brown Fun Foam blue Fun Foam

orange Fun Foam red Fun Foam

silver glitter pen

Measure and trim blue felt square to 14” x 20”. Place felt vertically.

Measure and fold a 1” seam at the top. Iron.

Fold a second 1” seam. Iron and glue the second fold. (You will be inserting the dowel rod through this loop.)

Using the patterns provided, trace and cut two large, two medium, and tow small circles from the white Fun Foam.

Glue these pieces to the blue background towards the center of the material.

Trace and cut the following:

The snow woman’s scarf and beret from the red Fun Foam

The snowman’s and snow woman’s noses from the orange Fun Foam

The snow woman’s buttons from the blue Fun Foam

The snowman’s hat, pipe and buttons from the black Fun Foam

The snowman’s scarf from the brown Fun Foam

Glue these pieces.

Make snowflakes and dots to show the mouths with the glitter pen.

Draw sticks to show the hands.

Trim the dowel rod to about 16” x 18”. Insert dowel rod through the loop. Cut the string to a length suitable for hanging and tie to each end of the dowel rod.

Hang from a window, door or wall.

Share Button

Kid’s Crafts: Joy to the World Holiday Banner

Kid’s Crafts: Joy to the World Holiday Banner

CHRISTMAS

As Christianity became the dominant religion in Europe, Christian holidays were held alongside pagan holidays and celebrations.

Christmas has its roots in Yule, the pagan celebration of the winter solstice held in Northern Europe. The ancient Romans also held a winter festival by commemorating the temple of the god Saturn on December 17th. They called it Saturnalia and later extended the holiday festivities from December 17th to December 23rd.

Christmas, celebrated on December 25th, closes the Advent season and begins the twelve days of Christmastide celebrations.

Early Christians adopted pagan customs as well as pagan festivals and celebrations. For example, the Christmas tree is based on the pagan custom of bringing greenery into the house during the winter.

Christians began celebrating Christmas in the 4th century copying the pagans who celebrated the harvest by feasting during the winter solstice. It was a way of livening up the shortest day of the year.

As Christmas became commercialized, various symbols became identified with the holiday: Santa Claus, snow people, angels, pine wreaths, reindeer, stars, horns, the manger, and more.

Joy to the World Banner

Joy to the World Banner

JOY BANNER

Ages: 5 – 12 years     Time: one hour

MATERIALS:

Gold glitter pen                                   white felt square 14” x 20”

Beige pompom                                   Kelly green craft foam sheet.

Beige felt square                                dark green craft foam sheet.

Gold felt square                                  red craft foam sheet.

Red felt square                                   String – double the length of the dowel rod

Dowel rod                                           Pattern (optional)


Measure and trim the white square to 14” x 20”. Place the piece vertically. Make a loop by measuring and folding and ironing a 1” seam. Measure and fold a second 1” seam. Iron and glue the second fold. You will be inserting the dowel rod through this loop.

Trace and cut the shapes using templates or stencils or use the patterns provided below. To create the wreath, cut 21 – 22 holly leaves from the Kelly green craft foam sheet and 9 – 10 holly leaves from dark green craft foam sheet. Glue the leaves in a circular arrangement using the top ¾ of the white felt background. Overlap the leaves as you form the design of the wreath.

Trace and cut the bow and letters from the red craft foam sheet. Glue the letters and the bow to the bottom of the wreath.

Trace and cut the angel’s dress out of the red felt, the horn from the gold felt, the wings and face from the beige felt. Glue these pieces in the center of the wreath.

Glue a little moss to form the angel’s hair just below the halo. Glue pompom to show hands and feet. Using the glitter pen, define the angel’s wings and bow.

Cut the dowel rod to about 16”. Insert through the top loop. Cut string to a suitable length. Tie strings to each end of the dowel rod and hang.

Happy Holidays!

Making banners is fun for the family. You can use the banner ideas described here or you can use them as a springboard for your own ideas and designs.

All you need are some basic supplies and a love of making crafts!

Patterns for Winter Banner

Patterns for Winter Banner

Share Button