OJO DE DIOS (GOD’S EYE)
What is an Ojo de Dios? The indigenous peoples of the Americas originally used them as an object of worship. Today the Ojo de Dios or Eye of God is also used as a decoration.
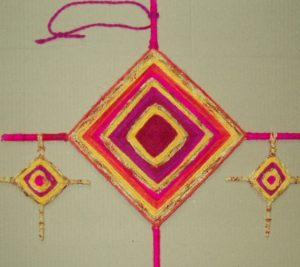
OJO DE DIOS (GOD’S EYE)
Materials:
Chop sticks or dowel rods (12” in length)
Yarn in assorted colors
Scissors
White glue
- Cross the chopsticks or dowel rod in the center. Pick a color for the center of the God’s Eye. Tie securely with the end of the yarn.
- Loop the yarn a couple of times to secure it further.
- Holding the center of the sticks, wrap the yarn under and around one of the sticks a few times. Make sure the sticks don’t show by pushing the yarn together on the stick. Pull snugly.
- Pull the yarn to the next stick. Wrap it under and around.
- Continue to wrap the yarn from stick to stick by wrapping under the sticks.
- If you choose to change colors, tie the yarn to a stick and cut off the excess. Tie on a second yarn.
- Continue to wrap until the sticks are almost covered. Make the final wrap and tie the yarn to the stick. You will need extra yarn so cut this piece about 5 “– 6” from the knot.
- Place a small amount of glue on the end of the stick. Wrap the end of the yarn over the glue, covering the entire end of the stick. Snip any excess yarn.
- Make a loop. Tie it to the opposite end of the stick and hang.
TIP: Small God’s Eyes make great Christmas tree and/or window ornaments. Pencils or short thin dowel rods can be used to make smaller Ojo de Dios ornaments.


Share this: