Tag Archives: paper bags

RECYCLED CRAFT PROJECT: PAPER BAG BOOKS

RECYCLED CRAFT PROJECT: PAPER BAG BOOKS
Paper Bag Books

Paper Bag Books

MATERIALS:

Brown (or white) paper grocery bags (or any unused paper)

Scissors

White glue or glue sticks

Embroidery thread (or similar thread or thin yarn) and needle

Awl

Typing paper

Decorative edge scissors (optional)

Decorations: photos, lace, buttons, pebbles, paper, pictures, fabric appliques, wallpaper scraps, etc.


VARIATION:

Use rubber stamps and ink pads to decorate the paper bags or potatoes cut into various shapes.

OPTIONAL EMBELLISHMENT:

Glitter dust – apply while ink is still wet


PROJECT:

  1. Cut the bottom off the paper bag. Cut up the side of the bag to make one flat piece. Decide how big you want your book. You can cut this piece in half or in four quarters. Fold the pieces so the writing is on the inside. Use as many bags as you need to make the number of pages you want. You many substitute typing paper or similar for the inside pages.
  2. Fold the pages in half. Stack the pages, one inside the other. Make holes along the fold with an awl for your needle to go through.
  3. If you are using embroidery thread, use three or four strands. Make a knot at one end of your thread. Sew along the fold and make a knot at the other end when you are finished.
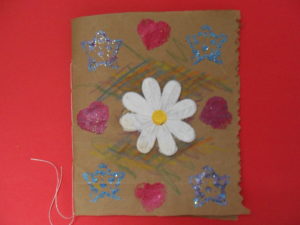
  4. Decorate the front and back covers.

The sample above was decorated with rubber stamps, sponges, rubber stamp ink, fabric applique, markers, and decorative edge scissors.

Share Button

Summer Camp: Paper Bag Animals/Paper Bag Pets

Summer Camp: Paper Bag Animals/Paper Bag Pets


Paper Bag People and Animals

Paper Bag People and Animals

Materials:

Lunch size paper bags, brown or white

Newspaper (or similar material)

String

Tape

Scraps of construction paper

Paste or glue

Ribbon and/or yarn

Sequins, buttons, seeds (for eyes, nose mouth)

Crayon and/or markers and/or colored pencils

Clip art

Scissors

Pipe cleaners (for whiskers)

Wiggle eyes

Rubber Band

Ruler


Project:

  1. Choose the pet or animal you will make.
  2. Stuff 1/3 of the bag tightly with crumbled or strips of newspaper (or similar material) to form the head (about two or three sheets).
  3. Gather the bag at the base of the head. Tie it securely with string or yarn.
  4. Stuff the rest of the bag with more newspaper and tape the bottom of the bag closed.
  5. Cut eyes, nose, mouth, and paws from construction paper or use sequins, buttons or seeds. Use pipe cleaners for the whiskers.
  6. Tie a ribbon or piece of yarn around the neck.
  7. Add buttons or other decorations to dress up you paper bag pet or person.

Alternative Projects:

  1. Make a paper bag person. Use yarn for hair and wiggle eyes. Follow the directions above.
  2. Stuff only the top 1/3 of the bag. Insert a long stick (like a ruler) into the head and secure with string, yarn or a rubber band. Use as a puppet and put on a play for your friends! Read the books below for more ideas:

Gauch, Patricia Lee. Poppy’s Puppet

Marsh, Valerie. Puppet Tales


Share Button