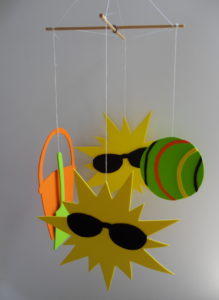
Tag Archives: art project

CELEBRATE THE SEASONS! Summer Is Fun! Mobile

CELEBRATE THE SEASONS! Summer Is Fun! Mobile
SUMMER MOBILE

SUMMER MOBILE

Ages: 5 – 12 years

Time: ½ hour – 1 hour

MATERIALS:

White felt square 36”x 36”

Orange craft foam

Yellow craft foam

White craft foam

Beige craft foam

Turquoise craft foam

Black craft foam

Moss

Black marker

White glue

scissors

String or jute or wire or thread

Dowel rods (plus cutters for cutting or sawing the dowel rods)

  1. Using the patterns provided, trace and cut the sun from the yellow craft foam, the pail from the orange craft foam, the shell from the beige craft foam, the shovel from the turquoise craft foam, and all four colors of craft foam for the ball. Finally, cut the sunglasses from the black craft foam. You don’t have to use all the patterns from the banners project.
  2. Take a small amount of moss and glue it on the top of the pail. Press down firmly while it dries.
  3. Use a black marker to draw the sun’s cheeks, smile and nose. If you are using the shell pattern, sketch a few lines on it to make it look three dimensional. Also, spell out “Summer Is Fun!”
  4. Cut two dowel rods. Tie a piece of string, jute or wire around the middle of the two dowel rods to secure them. Then, lace a piece of string, thread, jute, or wire 6” to 8” in length through the hole at the top of each shape. Tie the shapes to the dowel rods.
  5. To balance the mobile, place two or more shapes to each dowel rod and be sure that some of the shapes hang lower (or higher) than some of the others. Cut a string long enough to tie on either end of the dowel rods for hanging.
  6. Does your sculpture move? What makes it move? How is this design different from the banner design? Can you list the differences? Can you list the similarities? What is the difference between attaching the leaves on the mobile and attaching the leaves on the banner? What makes the leaves on the mobile three-dimensional and the leaves on the banner two-dimensional?
Share Button

VALENTINE PAPER GARLAND

VALENTINE PAPER GARLAND

Materials:

Paper in shades of pink, red, white and/or purple

Scissors

Pencil/eraser

Ruler or yard stick

Markers

Glue stick

Puncher for holes

Ribbon, paper twists or similar material

Heart-shaped stencils or templates (optional)

One chain link fence or interior wall (optional)

Project:

  1. Make a sign to celebrate Valentine’s Day or just make a string of hearts. Make a loop for every letter or heart and for the space between the words if you are making a sign. Make a loop at the beginning of your garland which will be blank and a loop for the end of your garland which will also be blank. For example, a sign that says “Happy Valentine’s Day!” will have 20 loops for the words (including the apostrophe and the exclamation mark), two for the spaces between words and an extra loop at each end. That would be a total of 24 loops.
  2. Use as many colored papers as you choose or use the suggested list of colors (above). Measure and cut the colored papers into ½” x 8” strips.
  3. Glue one strip of paper measuring ½” x 8” overlapping the ends. Then glue a strip of paper measuring ½” x 8” through the first loop. Alternate the colors of the paper strips until you have the required number of paper loops forming a garland.
  4. If you ae making a sign, cut paper rectangles in various colors about 1 1/2” by 3.” Make enough to spell out your message.
  5. Or cut out hearts using templates or stencils. Vary the design by cutting out small, medium and large hearts or overlap a small heart of one color over a larger heart of another color. See the examples provided.
  6. If you are sending a message, trace a letter on each paper rectangle by using a template, stencil or draw the letters free-hand. Trace or write free-hand any exclamation, question mark or symbol, too. Decorate the squares with paper hearts.
  7. Punch a hole at the top of each paper rectangle or heart. Punch a hole in the loops. Do not punch holes in the first and last loops and the loops that represent spaces between words.
  8. Cut string or pipe cleaners or similar material and loop it through the holes.
  9. VARIATION: Cut a slit in the hearts and loop it through the next loop. Close the loop.
  10. Use your imagination and glue seeds, glitter, sequins and other decorative objects! Dangle ribbon from the bottom of the hearts!
  11. Tie a string through the first and last loops and tie them on to the fence.

Happy Valentine’s Day!

Share Button

Summer Camp: Art Poster Collage

Summer Camp: Art Poster Collage


The best way to understand art is to make art. One easy introduction is to make a poster of photographs of works of art.

Take a trip to the museum with a parent and look at the works of art: paintings, sculptures, prints and drawings. There are many more forms of art, too, as you will see when you stroll through the galleries. These forms of art include the decorative arts such as pottery, jewelry or ceramics. Walk through the gift shop and collect postcards with works of art printed on them. Go to a thrift store or a flea market and buy old books or magazines about art or with works of art in them. Cut out the ones that are beautiful, interesting or meaningful.

Art Poster Collage

Art Poster Collage

MATERIALS:

Poster board, any size

Pictures of works of art from magazines, catalogs, old books, etc.

Rubber cement or glue stick

Scissors

  1. Cut out photographs of art works from magazines, newspapers, catalogs, or use postcards from the museum art shop. You can use copies of your art work, too.
  2. Your poster can have a theme like Greek Art (like the sample above) or Modern Sculpture or no particular theme. Glue the pictures to a piece of poster board forming a design.
  3. Study the pictures. Do you know which one is painting or sculpture or drawing or print? What do you like about them?
  4. Tape the poster inside your locker or on the door of your room. Or cut it to 8” x 2 ¼” and use the pieces as bookmarks.

* Art Work by Bridget Riley, Marion Constantinides, Kitagawa Utamaro, and Michel Touliere.


Share Button