Author Archives: marion

About marion

I first wrote and sketched as a child growing up in Pittsburgh, PA and Brooklyn, New York. I received her first recognition for my creativity when I won the New York City Schools Art Award and participated in my first art exhibit in downtown Manhattan. I was fourteen and a half when I moved to Cyprus with my family. I experienced culture shock but I continued to write about and sketch the sights and sounds of another country and many other things. I am a creative person. I write children's and Young Adult fiction and nonfiction. I write historical and Coming of Age Young Adult novels. I also write picture books and art books for elementary school children. I am in the process of writing a fictionalized biography of a member of the Belgian Resistance who also fought for the US Army during World War II. I worked as a freelance editor for two local companies: College Prowler and SterlingHouse Publisher. I also worked as an assistant literary agent for Lee Shore Agency. I was attending Seton Hill University’s Writing Popular Fiction Program at the time and the experience was invaluable. My course work toward my Master of Arts degree in turn helped me at work. As an assistant literary agent, I reviewed all incoming manuscripts, cultivated a relationship with the writers we contracted and marketed our books to book publishers for sale. I “freelanced” my editing skills which included working with the manuscript acquisitions editor, selecting book covers with the art department, writing the book jacket blurb, reading film scripts and executing general office duties as assigned. Oh, by the way, I edited books, too. I even utilized Adobe InDesign for the editing that I did for College Prowler. I’ve also reviewed published books and conducted research. I have published nonfiction articles and books online and in print. As an artist, I have exhibited my mixed media drawings and collages nationally and regionally and have worked as a freelance designer and calligrapher. I have a BA in Studio Arts from the University of Pittsburgh and a MA in Writing Popular Fiction from Seton Hill University.

Kid’s Crafts: Red, White and Blue Banner

Kid’s Crafts: Red, White and Blue Banner

RED WHITE AND BLUE BANNER

Fourth of July Banner

Red, White and Blue Banner

Ages: 5 – 12 years

Time: one hour

MATERIALS:

White felt 14” x 18”

Red, white, blue craft foam sheets

Sharp tool like an awl

¼” red, white and blue ribbon

Dowel rod 18”

String – double the length of the dowel rod

Measure and cut white felt to 14” x 20”. Place felt horizontally. Make a loop by measuring and folding and ironing a 1” seam. Measure and fold a second 1” seam. Iron and glue the second fold. You will be inserting the dowel rod through this loop. (This piece of felt should now measure  14” x 16”.)

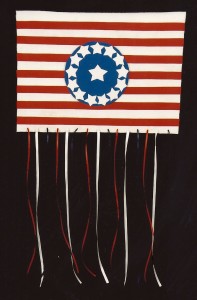
Using templates or stencils trace the large star pattern and cut one large star out of the white craft foam sheet. Cut 13 smaller stars out of the white craft foam using the smaller star pattern. Trace and cut a large circle out of the blue craft foam sheet. Glue the large star in the center. Arrange the smaller stars around the circle. Make sure that they all face the same way. Lay aside.

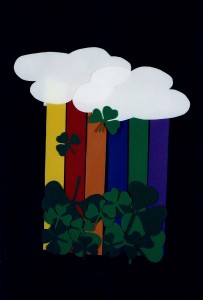
Measure and cut 7 stripes ¾” x 16” out of the red craft foam sheet. Arrange the stripes on the banner so that there is a ¾” stripe of white felt showing between them. (Refer to the photo of the banner.) Glue the stripes down and trim if necessary.

Glue the blue circle with the stars in the center of the red and white stripes.

At the bottom of the banner, poke holes every 1” with a sharp tool like an awl. (Small children should let adults do this for them.) Insert the ribbon in the holes, alternating the colors. Pull the ribbon through and tie a knot in the back.

Trim the dowel rod to 18”. Cut a piece of string to a length suitable for hanging. Tie the string to each end of the dowel rod. The first Fourth of July celebration occurred in Philadelphia, PA. Eventually, all the states celebrated the holiday which included parades, picnics, military displays and fireworks.

VARIATION: You can also hang your banner on Memorial Day or Labor Day!


Share Button

Our Imaginations! Camp for Kids: Fence Weaving

Our Imaginations! Camp for Kids: Fence Weaving

The craft Fence Weaving was adapted from the project “From the Yard/Fence Weaving” found in All-Around-the-House Art and Craft Book by Patricia Z. Wirtenberg and published by Houghton Mifflin Company in1968.

Materials:

One fence preferably a chain link fence

Ribbon, yarn, pipe cleaners, tassels, string, rope, feathers, strips of fabric or paper, and anything else that easily woven through or tied on a chain link fence

Pompoms, beads, tiny shells, paper dessert cups, and anything else  glued to ribbon, yarn, strips of fabric or paper, etc. and attached to the links in the fence. Bits of drawings or photographs can also be used.

Scissors

Glue

1)      Weave, loop or tie materials such as pipe cleaners, ribbon, yarn, rope, strips of fabric or paper and string diagonally, vertically or horizontally through the links in the fence.

2)      Weave or loop or tie the ends of fabric, ribbon or paper through the links in the fence and secured with glue. The more you material you use, the more festive the fence looks.

3)      Glue artificial flowers, beads, tiny shells, and similar items to ribbon, strips of fabric or paper, etc. Weave the ends through the links in the fence.

4)      Make a garland of paper or similar material and attach the ends to the fence. Celebrate the Fourth of July with a red, white and blue garland!

5)      Cut paper letters and/or numbers and glue to a long strip of paper or ribbon and attach to the links in the fence at each end. Anything goes! The signs can say “Happy Summer!”  “Enjoy Summer Camp!” “Hooray for Summer!”

6)      Another idea: decorate the fence according to themes: nature; summer/seashells; art; Disney; cars/trains/airplanes; sports, etc.

Fence Weaving Nature Theme

Fence Weaving Nature Theme

Fence Weaving

Fence Weaving

Share Button

What Events Happened in 1968?

What Events Happened in 1968?

After you’ve finished your project, Nature Prints, read the Fun Facts below:

1968: Fun Facts

From:

www.thepeoplehistory.com

http://en.wikipedia.org

www.historyproject.org

Find out the prices for consumer goods for the year 1968 by clicking on the links provided above.

Fashion:

What was popular to wear in 1968? How much did clothing cost?

The androgynous hippie look (frayed bell-bottom jeans; sandals; work shirts; headbands; tie-dyed T-shirts; going barefoot and sometimes braless)

Fringed buckskin vests

Flowing caftans

Lounging pajamas which consisted of tunic-top over floor-length culottes made of polyester or chiffon

Mini-skirts with a French polo-neck top

Square-toed boots

Newsboy cap or beret

Long maxi coats often belted

Women’s shirts with transparent sleeves

Psychedelic prints.


Hair:

How much did a hair cut cost?

Mop-tops like the Beatles

Long hair including beehives

Short hair like Twiggy

Men wore mustaches, goatees, beards and sideburns.


Miscellaneous: Fashion, Consumer and Cultural Trends

Hosiery

Tights

Jeans

Ponchos

Love beads

The peace sign

Medallion necklaces

Moccasins

Chain belts

Polka-dot printed fabric

Long puff or bubble sleeves

Polyester materials

Go-go boots

Andy Warhol and Pop Art

Apple Records was formed

The White Album is released

60 Minutes airs for the first time on CBS


Popular Films:

How much did a movie ticket cost?

2001 Space Odyssey

Planet of the Apes

Funny Girl

Rosemary’s Baby

The Lion in Winter

Oliver!

Romeo and Juliet


Broadway:

Hair


Television Shows:

How much did a black and white TV set cost?

Here’s Lucy

Star Trek

Julia

The Lawrence Welk Show

The Doris Day Show

Hawaii Five-O


Songs:

Hey Jude – Beatles

(Sittin’ On) The Dock of the Bay – Otis Redding

Honey – Bobby Goldsboro

Stoned Soul Picnic – Fifth Dimension

Mrs. Robinson – Simon and Garfunkle


Books:

Myra Breckenridge by Gore Vidal

In the Heart of the Heart of the Country by William H. Glass


Sports:

Green Bay (vs. Oakland) won the Super bowl

Detroit (vs. St. Louis) won the World Series

Montreal Canadiens (vs. St. Louis) won the Stanley Cup

Billy Jean King won the women’s and Rod Laver won the men’s competition at Wimbledon

Forward pass won the Kentucky Derby

UCLA (vs. North Carolina) won the NCAA trophy

Ohio State won the NCAA title in football

Manchester United won the European Cup


Headline News:

Lyndon B. Johnson was the 36th President of the US and Hubert Humphrey was the 38th Vice-President of the US

Viet Nam war escalates; American opinion turns against US participation in the conflict

The anti-draft movement gained momentum as a result of the war

Martin Luther King, civil rights leader, is assassinated on April 4th

Robert F. Kennedy, presidential candidate, was assassinated on June 5, 1968

Richard Nixon was nominated for President at the Republican National Convention held in August

Hubert Humphrey was nominated for President at the Democratic National Convention also held in August

In September, Women’s Liberation groups, including the National Organization for Women, protested the Miss America Beauty Contest in Atlantic City

Student protests increased in the US and France and later in the year, Mexico

Apollo 7 was launched from Florida for an eleven day journey to orbit the Earth 163 times

The Civil Rights Act was passed by Congress in April


Try a popular recipe from 1968!

From the 1968 cookbook Blue Ribbon Recipes:

Applesauce Brownies

½ cup shortening

12 cup cocoa

2 eggs

1 cup sugar

½ cup sweet applesauce

1 tsp. vanilla

1 cup flour

½ tsp. soda

1/8 tsp. salt

½ tsp. baking powder

½ cup black walnuts (optional)


Melt shortening; add cocoa, then eggs, then sugar. Beat all well. Add applesauce and vanilla Mix dry ingredients with nuts; add and mix well.

Pour onto greased/floured brownie sheet.

Bake 25 minutes at 350 degrees.


Share Button

Our Imaginations! Camp for Kids: Nature Prints

Our Imaginations! Camp for Kids: Nature Prints

The craft NATURE PRINTS was adapted from the project “From the Yard/Nature Prints” found in All-Around-the-House Art and Craft Book by Patricia Z. Wirtenberg and published by Houghton Mifflin Company in1968

Materials:

Leaves, bark, twigs

Printer’s inks or poster or acrylic paints in various colors (cheaper to use)

Drawing pencils (optional)

Rice or bond paper in white or various light colors (works best with poster/acrylic paints)

Brown wrapping paper or construction paper for use with printer’s inks

Brayer (or roller)

Piece of glass

Newspaper

Solvent for cleaning brayer and glass if using printer’s inks unless using water-soluble printer’s inks

  1. Collect fresh leaves from the trees or bushes in your neighborhood or yard. You will need some to experiment with and some for the last print. Other objects such as tree bark (if it’s easy to peel off) and even some twigs will work along with the leaves, too.
  2. Cover your work surface with newspaper. Lay down the glass and brayer on the work surface. Select the paints or inks that you will use. Acrylic or poster paints are less expensive than oil-based printer’s inks and easier to clean up after use.
  3. You can squeeze one color for each leaf or squeeze two or three colors side-by-side on the glass. The leaves in the samples shown used one or two or three colors at one time.
  4. Roll the paint or inks on the glass until the pigment covers the brayer. If you are using more than one color, let the colors run into each other. Roll the brayer over the leaf several times and turning the leaf over, lay it on a piece of paper like rice paper or bond paper. Use your hand to press the leaf so that it prints on the paper. Paper that is not too thick or too thin is the best to use if using acrylic or poster paints. Printer’s inks can use a slightly heavier paper like construction or brown wrapping paper.
  5. Remove the leaf and see how it printed on the paper. Experiment until you have a print that you like. Experiment with other materials from nature combined with the leaves.
  6. To create a mixed media design, color the whites of the leaves or the background paper or outline the printed leaves with colored pencils. See the two samples below.
  7. Frame the print or using old note card stationery, make note cards or poster cards of the printed leaves. They make a thoughtful gift for people who still write notes!
Nature Prints

Nature Prints


Nature Prints

Nature Prints


Nature Prints

Nature Prints


VARIATION:

Make a sun print! Make sure you do this on a sunny day! Choose the objects you will use as the main design of the print. Objects like leaves, twigs, bark, seashells, and pebbles work well. Lay the objects that you choose on photographic, construction or drawing paper on a surface in a sunny location. The longer you leave it there, the deeper an impression your objects will make on the paper. Leave the objects and paper in the sun for four hours minimum. Remove the objects. You now have a sun print! Use the sun print for the nature collage tutorial or frame it and hang the print on your bedroom wall.


Sun Print

Sun Print


Share Button

Kid’s Crafts: Accordion Mini-Album for Father’s Day

Kid’s Crafts: Accordion Mini-Album for Father’s Day

*Materials:

Cardboard for the cover of the mini-album

Rice paper or wrapping paper or any light-weight paper to cover the mini-album

White glue, rubber cement, glue stick

Bond, construction, scrapbook paper, wrapping paper to mount the photos

Double-sided mounting squares or corners

Materials for decorating mini-album: sequins, glitter, paper, stickers, rubber stamps/stamp pad, markers, colored pencils

*Refer to the photos when necessary . Variation of the craft below the How-to.


1.  Measure the photos you selected for the album. Using those measurements, measure and cut two pieces of cardboard. If you are using thin cardboard, measure and cut four pieces. Glue two together and glue the other two together. This will make the cover of the album stronger. If you are using matt board or similar thick board, you do not have to do this. Allow to dry.
2.  If you are using 2 – 4 photos, measure four sections the height and width of the photos along the length of the bond, construction, wrapping paper or scrapbook paper of your choice. In other words, if your photos are 3 1/2” x 5”, you will measure four continuous sections each measuring 3 ½” x 5”. Cut the length of the paper (do not cut the individual sections) and fold in four. This will be the accordion or inside of the album.
3.  Select the paper you will use to cover the cardboard. If your cover measures 3 ½” x 5” add ½” to all four sides of the paper. Cut. You will fold the excess paper and glue it to the backside of the cover.  (The excess paper will be hidden by the accordion. This will become clearer in the next step.)
4.  Fold down and glue the corners first. Then fold down and glue the sides. Apply thicker glue when using thicker paper. Allow to dry. Use pressure so that the paper sticks firmly to the cardboard.
5.  Check the accordion paper against the cover and trim paper if necessary. Glue one folded section of the accordion to the inside of one of the covers. Glue the other end to the other cover.  Apply pressure and allow the glue to dry.
6.  Mount the photos using double-sided mounting squares. Decorate the cover with stickers, stamped art, markers, cut paper, sequins, and more.
Happy Father’s Day!

VARIATION: Don’t want to download photos? Sketch a self-portrait of you and family members instead!

Share Button

Kid’s Crafts: Flowers for Mother’s Day!

Kid’s Crafts: Flowers for Mother’s Day!

Kid’s Crafts: Flowers for Mother’s Day


Materials:

Popsicle sticks (use wide popsicle sticks if they are available)

Craft Foam in various colors, construction paper or paper with designs or patterns

Glue or glue stick

Scissors

Pencil with eraser

Markers in brown and/or green or poster or acrylic paint in brown and/or green

Pompoms in various colors (optional)

Patterns (below)

  1. Trace and cut patterns: there are two sets for two kinds of flowers.
  2. Select papers or Craft Foam for the flower petals or the round flower. Trace patterns and cut.
  3. Use petal patterns for the leaves. Trace and cut in green Craft Foam or other craft paper. Use a minimum of two leaves per flower.
  4. Paint Popsicle stick in brown or green or color with markers or paint.
  5. Glue petals around the Popsicle stick or glue the round flower at the top of the Popsicle stick.
  6. Glue a pompom in the center. Or trace a penny or other small coin on the Craft Foam or other paper of choice for the center of the flowers. Cut and glue.
  7. Place in plants to give as gifts for Mother’s Day. Or make several flowers and place in a vase.


Happy Mother’s Day!

Patterns for Mother's Day Flowers Project0001


Share Button

Kid’s Crafts: Easter Egg Banner

Kid’s Crafts: Easter Egg Banner

EASTER

Easter celebrates Jesus Christ’s resurrection that usually occurs during springtime. The holiday includes a forty-day period of fasting known as Lent which ends on Easter Sunday with joyous feasting.

Easter is a “movable feast” which Christians celebrate on a different day each year. Easter, like other holidays, has its roots in pagan rituals and beliefs. Some historians believe that the word “Easter” derives from the name “Eastre,” the Teutonic goddess who represented springtime and fertility. Pagans celebrated her festival on the first day of spring.

Easter symbols include the Easter rabbit, a symbol of fertility, and eggs dyed in different colors which symbolize birth.  The  Ukrainian tradition of Pysanky or egg dyeing influenced the Easter banner design in the craft project below. (The word “pysanky” means “to write.”) Ukrainian Easter eggs are known all over the world for their beauty and colorful, intricate designs. The number of symbols and colors used in the design of the eggs grew as the craft became popular.

Each object/symbol and color has a special meaning:

Sun – the source of light and life

Star – success

Birds – spring, a good harvest

Heart – love

Fruits and vegetables – the good life

Wheat – the life’s work of the Ukrainian peasant

Animals – prosperity and wealth

Bees – hard work

Tree – strength, long life, good health, youthfulness

White – purity

Yellow – wisdom, a successful harvest

Green – spring, rebirth of nature

Blue – good health, sky, air, magic

Red – happiness, passion, hope

Brown – earth, mountains

Purple – faith, trust

Ukrainian eggs are first divided into triangles, squares or circles and then other objects are added: the sun, flowers, wheat, etc.

EASTER EGG BANNER PROJECT0001


EASTER EGG BANNER

Ages: 5 – 12 years

Time: one hour

MATERIALS:

Pink craft foam sheet

Blue craft foam sheet

Yellow craft foam sheet

Yellow felt square 14” x 20”

Dowel rod 18”

String – double the length of the dowel rod

Measure and cut the yellow felt square to 14” x 20” and place it vertically. Make a loop by measuring and folding a 1” seam and iron. Measure and fold a second 1” seam. Iron and glue the second fold. You will be inserting the dowel rod through this loop. (This felt piece should now measure  14”x18”.)

Using templates or stencils trace and cut a large egg from the pink craft foam sheet. Glue it on the center of the yellow felt piece. Cut the double cross pattern, 5 small eggs, six small petals, and 4 large petals out of the blue craft foam sheet. Cut six small petals and 4 large petals from the yellow craft foam sheet. Cut 5 small eggs and 2 tiny circles from the pink craft foam sheet.

Glue the double cross on the large egg. Place 4 large yellow petals near the center of the top cross. Glue a pink dot in the center of the cross. Arrange 6 blue petals near the top and sides of the cross. Glue 4 large blue petals near the intersection at the bottom of the cross. Glue a pink dot in the center of the bottom cross. Arrange 6 small yellow petals near the bottom and sides of the cross and glue. Glue small blue and pink eggs in a random pattern around the central egg.

Cut the dowel rod to approximately18”. Insert a loop at the top. Cut the string to a length suitable for hanging. Tie the string to the ends of the dowel rod. Decorate your home by hanging the Easter Egg Banner from a window, on a wall or door.

VARIATION: What other symbols have special meaning to you? Use them in your own Easter Egg Design.


Share Button

Kid’s Crafts: St. Patrick’s Day Banner

Kid’s Crafts: St. Patrick’s Day Banner

KID’S CRAFTS: ST. PATRICK’S DAY

March 17th is the feast day of St. Patrick, patron saint of Ireland. No one knows exactly when St. Patrick was born although historians believe that he was born in Britain. We do know that his real name was Succat and when he was sixteen years old, Irish pirates attacked his family’s estate and kidnapped Patrick,. The pirates forced him to live as a herdsman in somewhere in Ireland. During this time, he became a devout Christian and began to see visions. After six years of enslavement, his visions told him to escape.

He returned to his family but later, fled for the northern coast of Gaul where he became a priest. His course of study lasted 15 years and when it ended, he returned to Ireland, and eventually became Bishop of Ireland.

Symbols associated with St. Patrick’s Day include the leprechaun and the shamrock.  Leprechauns are a race of elves who gave their gold to anyone who could catch them. The shamrock became the national symbol of Ireland because St. Patrick used its three leaves to explain the idea of the Holy Trinity to the Irish people. This was St. Patrick’s way of incorporating Irish customs and beliefs into his teachings of Christianity.

ST. PATRICK'S DAY BANNER PROJECT0001


ST. PATRICK’S DAY RAINBOW

Ages: 5 – 12 years

Time: one hour

MATERIALS:

Kelly Green craft foam sheet

Purple craft foam sheet

Dark Green craft foam sheet

Orange craft foam sheet

White craft foam sheet

Blue craft foam sheet

Red craft foam sheet

Dowel rod 20”

Yellow craft foam sheet

String – double the length of the dowel rod

Using templates or stencils (or enlarge the patterns provided below ) trace and cut two clouds out of the white craft foam sheet.  Place one cloud slightly lower than the other and so that they partly overlap each other. Glue. Trace and cut 3 small, 2 medium, and 2 large shamrocks out of the dark green craft foam sheet. Trace and cut 3 small, 2 medium, and 2 large shamrocks out of the Kelly Green craft foam sheet.

Arrange the large shamrocks in a random pattern on the bottom part of the banner and glue. Place one small Kelly Green shamrock and one small dark green shamrock aside. Arrange the rest of the shamrocks so that they  overlap the dark green shamrocks, etc., and glue the pieces. Glue the two shamrocks that you laid aside so that they appear to tumble from the clouds. Avoid centering them on the design because the design will look more interesting if the shamrocks are scattered to the left and right of the design.

Cut three strips 8” x 1 1/2” out of the white craft foam sheet. Glue the ends of each strip so that they form a loop. When the loops are dry, glue the loops to the back of the banner. Insert the dowel rod through these loops and hang your banner for St. Patrick’s Day.

Erin go bragh! (Ireland forever!)

VARIATION: The rainbow in the design reaches for a pot of gold. Where does your rainbow go and how far? Try making your own banner design using four-leaf clovers.


Cloud pattern

Pattern Cloud St. Pat’s Day Banner

Patterns for two shamrocks

Shamrocks Pattern

Share Button

Votive Candleholder

Votive Candleholder

Beat the winter doldrums with a fun craft project! Use it as a Valentine’s Day decoration, give as a gift

 or use it all-year round! Super easy and cheap to make too!

Votive Candleholder

Materials:

Shells in different sizes

Strand of pearls or beads

Large clear vase with a neck (See photo)

Small votive/candle holder (make sure it fits into the opening of the vase)

Small candle or tea light that fits into the votive holder

Optional: Ribbon (the neck of the vase will decide the width and length of the ribbon)

1. Wash and dry the vase and candle holder/votive so that they shine.

2. Let the shape of the vase dictate where the shells, pearls and other objects of  choice will lay inside the vase.

3. Intertwine one strand of beads or pearls. Add some shells. Mix again.

  1. Place the larger shells and pearls or beads next and then intertwine another strand of beads or pearls.
  2. Finally, arrange the medium objects on top. Add the last strand of pearls or beads.  Mix. Make sure there is enough room for the candle holder/votive which should protrude above the neck of the vase just enough so that it is noticeable.
  3. Optional: Tie a bow around the neck of the vase

If the vase is narrow at the bottom, and widens just below the neck, place the small ones on the bottom. Refer to the photo of the finished craft.

Substitutions for the vase:

Potpourri

Small handmade soaps

Beads

Buttons

Heart-shaped paper cutouts

Ribbons

Mix it up!

Substitutions for the votive/candle holder:

Flower bud

Tiny beads

Colored water

Potpourri


Share Button

Kid’s Crafts: St. Valentine’s Day Banner: Quilted Heart

Kid’s Crafts: St. Valentine’s Day Banner: Quilted Heart

KID’S CRAFTS: ST. VALENTINE’S DAY

Lupercalia was a Roman holiday held in honor of Lupercus, the god of the pasture and fertility. The event was held on February 5th in a cave on Palatine Hill in Rome. The priests who were known as the Luperci, conducted the rituals associated with the Lupercalia festival. These rituals included sacrificing animals like goats and dogs; feasting followed. The celebrations continued when the Luperci cut thongs from the skins of the sacrificed animals. The priests divided into two groups and ran around the city swatting people with the thongs. The festival participants believed that a blow from one of the thongs encouraged fertility.

The early Christian Church tried to convert unbelievers such as the followers of the Luperci, by combining pagan customs with their own beliefs. The feast day of two Roman martyrs (both named Valentine) had its origins in the Lupercalia festival. The one saint had been a priest and the other had been the Bishop of Terni, and both died in the same day in the third century A. D.

VALENTINE’S DAY CRAFT

QUILTED HEART BANNER PROJECT0002

QUILTED HEART

Ages: 5 – 12 years

Time: one hour

MATERIALS:

Yellow felt square 16” x 14”

Dowel rod 18”

Red, pink, yellow, and white craft foam cut into 2″ x 2″ squares

¼” ribbon in red, yellow, pink and white.

String – double the length of the dowel rod

poster board or single sheet of craft foam of any color

Using a template or a stencil or drawing by hand, trace the heart on to poster board or a single sheet of craft foam of any color and cut. The heart should measure about 13 3/4″ x 10.”

Cut 8 yellow, 11 red, 10 white and 10 pink squares from the craft foam sheets. The squares should measure 2″ x 2.” Divide the heart in half vertically and in half again horizontally. (Refer to the photo of the banner.)

Lay the squares down along the horizontal fold in the following pattern: white, yellow, pink and red. Place the next row of squares below the first row. Stagger the colored squares so that the second row is not directly beneath the first row. Repeat the pattern until the squares cover the heart. Glue. Allow the pieces to dry.

Fill in the odd-shaped areas with the appropriately colored squares and glue. When those pieces are dry, turn the heart around and trim along the outline of the heart. Measure and cut the felt to 16” x 14”. Place it horizontally. Make a loop by measuring and folding a 1” seam. Iron. Measure and fold a second 1” seam. Iron and glue the second fold. You will be inserting the dowel rod through this loop. (The length of the banner will be about 16” x 12.” This does not include the ribbons.)

Measure and cut two 18” lengths of each color of ribbon. Poke a hole every two inches along the bottom of the felt with a sharp tool. Alternate the colors, pull the ribbon through and tie a knot in the back so that the ribbon is held in place. (Small children should let adults do this for them.) Glue the heart on the felt. Cut the dowel rod to 18” and insert through the loop at the top. Cut the string to a length suitable for hanging. Tie the string to each end of the dowel rod.

VARIATION: Use other shapes to decorate your heart banner: circles/dots, flowers, squiggle lines, triangles, etc. Today, Valentine’s Day honors lovers. We celebrate Valentine’s Day on February 14th by sending gifts like candy and cards.

Happy Valentine’s Day!

COPYRIGHT 2013 Marion Constantinides

Share Button