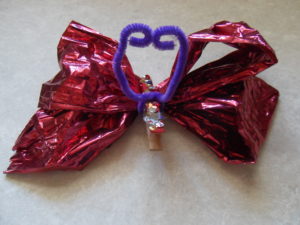
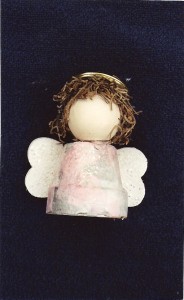
Tag Archives: glitter

Holiday Craft: Iridescent Angel

Holiday Craft: Iridescent Angel

Iridescent Angel

IRIDESCENT ANGEL

*MATERIALS:

2 wood hearts

Wood knob or ball

18” long pink or white ribbon

clay pot

Flesh, brown, black and white paint (2 more colors of choice)

1 11/2” brass ring

Moss

1(1/2 oz.) crystal iridescent glitter

2 jars or bowls for water

Brushes/scissors/white glue/plastic baggie

1. Paint the bottom and sides of the clay pot with two coats of white paint. Set aside to dry between the first and second coats.
2. Fill half a small plastic bag with glitter. Paint the two wooden hearts with white acrylic  paint. Place the wooden hearts in the plastic bag, tie it with a twist tie and shake. Be sure that the hearts are totally covered on the one side with the glitter. Remove the hearts and let them dry. These will be the angel’s wings.
3. The wooden knob is head of the angel. Paint it flesh or brown or black. Let it dry.
4. Paint the clay pot with dabs of different colors: pink and silver or any other color combination
5. While it is still wet, place the pot into the baggie filled with glitter. Shake well and cover the entire pot with glitter. Remove and let it dry.
6. Cut the moss. Roll the back of the angel’s head in tacky glue and then roll the head in the moss. This is the hair of the angel. Trim excess “hair” with scissors.
8. Cut a long piece of ribbon and fold it in half. Pull the loop through the clay pot and position it. Tie the ends in a large double knot and pull the ribbon completely through the hole in the clay pot.
9. Glue the brass ring on top of the angel’s head. Glue the head to the pot. Glue the hearts to the back of the pot with the glittery side facing you.
10. Enjoy the iridescent angel for the holidays!

Recycle materials: Cut pieces of paper (for example, leftover tissue, rice or wrapping paper) and glue them to the pot, overlapping the pieces so the different colors and patterns show through the layers.

Other ideas: Instead of a clay pot, use a spool of thread once the thread has been used up.
Replace the moss with scraps of yarn or ribbon for the hair
Do you have leftover clay? Roll it into a ball, let it harden and use it for the angel’s head


Share Button

BUGS AND THINGS: Butterfly

BUGS AND THINGS: Butterfly
BUTTERFLY

BUTTERFLY

BUTTERFLY

Butterflies belong to the order of Lepidoptera which means “scaly wings.”

Butterflies and moths live in high mountains, warm tropical rainforests, the Artic tundra, deserts and swamps. Some pollinate flowers but some are also pests. They help the environment by providing food for bats lizards, frogs and birds.

 Scientists have discovered one million creatures in the animal world; ¾ of these are insects. Of these, 18,000 to 20,000 different kinds of butterflies have been identified.

During the fall, monarch butterflies fly as far as 3,000 miles to their winter homes. None of them return to their place of origin because few of the live longer than a month. Only some butterfly species can journey very far.

Materials:

Paper Twist or similar wide wire ribbon (color of choice)

Chenille stems (color of choice)

Clothespin

sequins, glitter, markers, etc.

Project:

  1. Unfurl the twist and lay one end down on a smooth surface. Determine the length. For example, if you choose to make a 6” butterfly, unfold it, and lay down 6” of twist going in one direction. Lay down another 6” going in the other direction. Continue in this manner until you have 3-4 loops of twist on each side. Cut off any excess.
  2. Pinch the twist loops in the center with a clothespin.
  3. Decorate the clothespin with sequins, glitter, markers, and other craft items.
  4. Take two chenille stems and wrap them around the clothespin. Curl the ends so that the stems look like antenna.


Share Button

Lazy Day Crafts: Papier Mache Dragon

Lazy Day Crafts: Papier Mache Dragon

Materials:

Newspaper, cut into strips

Scissors

Wall paper paste or white glue slightly thinned

Containers for water and paste

½ egg carton preferably made of paper or cardboard

4 – 6 oz paper cup

Masking tape

Bond or construction paper

Green acrylic or poster paint or any color you choose for your dragon

Glitter, buttons, tissue paper, wiggle eyes, foil, etc

Paint brushes

Paper towels


  1. Cover your work space with newspaper. Cut egg carton in half and tape it shut. Tape the paper cup to one end of the carton. (This will be the head of the dragon.) Make a long tube with the construction paper and tape it to the other end of the carton. (This will be the tail of the dragon.)
  2. Cut newspaper into strips.
  3. Read the directions on the label for using wallpaper paste. Mix wallpaper paste with water and stir. Pour into container.
  4. Dip strips into paste mixture. Allow excess paste to drip off into container. Apply to the dragon mock-up. Apply two or three layers. Allow to dry. Add more layers if needed and apply them when the first three layers are dry. Dry thoroughly.
  5. Paint the dragon with acrylic or poster paint. Allow the paint to dry.
  6. Decorated the papier-mache dragon with a variety of embellishments. Use your imagination!


Share Button

Our Imaginations! Have a Too Cool Day!

Our Imaginations! Have a Too Cool Day!
Too Cool Sunglasses

Too Cool Sunglasses

Read Pete the Cat and His Magic Sunglasses by Kimberly and James Dean.

“Pete the Cat did not feel happy. Pete had never, ever, ever, ever been grumpy before. Pete had the blue cat blues.”

Grumpy Toad usually was grumpy but on the day he met Pete the Cat, he was wearing cool, blue, magic sunglasses which made him look at everything in a new way.

When Pete the Cat tried them on, he saw the world in a whole new way, too.

Walking along with his new attitude, Pete the Cat ran into his friends, Squirrel, Turtle and Alligator and lent them his cool, blue, magic sunglasses. They saw the world in a whole new way just like Pete the Cat and Grumpy Toad!

Isn’t that cool?

Then Pete the Cat fell and cracked his cool, blue, magic sunglasses.

What would he do without them?

The Wise Old Owl told him the truth: Pete the Cat didn’t need his cool, blue, magic sunglasses to see the world in a new way. “Just remember to look for the good in every day,” the Wise Old Owl told him.

Pete the Cat looks all around him and exclaimed, “Too cool!”


Project:

Decorate a pair of sunglasses to brighten your day like Pete the Cat and his friends.


Materials:

Sunglasses*

Strong glue like gorilla glue

Sequins

Paint in squeeze tubes or bottles

Glitter

Make your sunglasses the coolest ever – you don’t have to paint your glasses blue like Pete the Cat’s! You can paint them any color or design.

*Remember: if you paint the lenses, you won’t be able to see through them!

 Additional Reading:
Lizzie Logan Wears Purple Sunglasses by Eileen Spinelli


Share Button