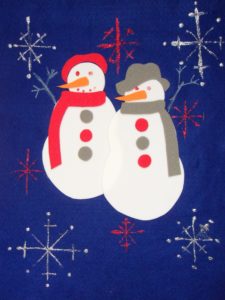
MR. AND MRS. SNOW PEOPLE
Ages: 5 – 12 years
Time: ½ hour – 1 hour
MATERIALS:
Blue felt square 36” x 36”
Black Fun Foam
Black Marker
White Fun Foam
Brown Fun Foam
Silver glitter pen
Blue Fun Foam
Orange Fun Foam
Red Fun Foam
1. Measure and trim blue felt square to 14” x 20”. Place felt vertically. Measure and fold a 1” seam at the top. Iron. Fold a second 1” seam. Iron and glue the second fold. (You will be inserting the dowel rod through this loop.)
2. Enlarge the photo of the banner (above). Then trace and cut two large, two medium, and two small circles from the white Fun Foam. Glue these pieces to the blue background towards the center of the material.
3. Trace and cut the following:
The snow woman’s scarf and beret from the red Fun Foam
The snowman’s and snow woman’s noses from the orange Fun Foam
The snow woman’s buttons from the blue Fun Foam
The snowman’s hat, pipe and buttons from the black Fun Foam
The snowman’s scarf from the brown Fun Foam
4. Glue these pieces.
5. Make snowflakes and dots to show the mouths with the glitter pen. Draw sticks to show the hands.
6. Trim the dowel rod to about 16” – 18”. Insert dowel rod through the loop. Cut the string to a length suitable for hanging and tie to each end of the dowel rod. Hang from a window, door or wall.


Share this: