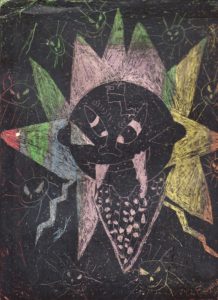
Tag Archives: poster board

Lazy Day Crafts: Sgrafitto

Lazy Day Crafts: Sgrafitto
Sgrafitto

Sgrafitto

Sgrafitto is an etching technique that uses a pointed tool to scratch through a covered surface to show the art work beneath it.

Materials:

Wax crayons (Do not use black)

India ink or back poster paint

Pointed tool for etching such as a knitting needle or a toothpick

Cardboard or mat board

Brush


  1. Draw and color various abstract shapes on the cardboard or mat board. Make sure to use a heavy hand and leave a thick layer of wax crayon.
  2. Paint the cardboard or mat board with India ink or black poster paint. Allow the surface to dry completely. If the wax crayons show through, you need a second coat of paint or ink. Allow this coat to dry.
  3. Select the pointed tool you will use. You can experiment with different tools on a scrap of cardboard and then decide which one is best for your work of art.
  4. Have an image or design in mind or draw one on sketch paper first. Etch the design directly on the painted cardboard or mat board using various strokes: long, short, or circular going in various directions: horizontal, vertical or diagonal. Etch deeply enough to penetrate the first layer of ink or poster paint.
  5. Frame the Sgrafitto and don’t forget to etch your name in the lower right-hand corner.


Share Button

The Double-Headed Serpent: Paper Mosaic Design

The Double-Headed Serpent: Paper Mosaic Design
Paper Mosaic Design

Double-Headed Serpent Paper Mosaic Design

Materials:

White pencil (optional)

Poster board or matt board

Construction or similar paper in four colors

Scissors

Pencil/eraser

Ruler

Double stick tape

Glue stick

Utility knife

White paper (optional)

Paper Clips (optional)

Project:

  1. Select a design like the double-headed serpent in this project. (Double-headed serpents were popular cultural and religious symbols among the Aztec and Mayan people.)
  2. Draw the object on poster or matt board. Or draw it on a piece of white paper. Turn the paper over and blacken the back of the design with pencil. Turn it over to the front, place it on the matt or poster board and secure the paper on the board with paper clips or tape. Trace.
  3. Design a border around all four sides of the design.
  4. Select three or four colors of the construction or similar paper. Decide where to place the paper mosaic tiles. Measure and cut these paper tiles no smaller than 1/ 4” x 1/ 4.” The smaller the size of the tiles, the longer it will take to complete the project.
  5. Decide the color pattern. Lay down strips of double-stick tape on the area, one strip at a time, and place the paper tiles side by side, forming a mosaic pattern. In the sample, the colors of tile form a random design. Repeat until the area finished. Use a utility knife to shape round corners, etc.
  6. Following step #2, trace the central design on the construction paper and cut and glue this cut-out to the poster or matt board. If you are using the double-headed serpent as the central design, use a white pencil to highlight the eyes and teeth.
  7. Cover the other areas of the design including the border.

Bibliography

Morris, Ting. The Arts and Crafts of the Aztecs and Maya. North Mankato, MN: Smart Apple Media, 2007.

Robinson, Fay. Hispanic-American Crafts Kids Can Do! Berkeley Heights, NJ: Enslow Elementary, 2006.

Share Button