FIRST MAKE THE QUILLED CATERPILLAR
MATERIALS:
(4) 24” quilling papers of different colors
(2) 12” quilling papers of two of the colors used for the body of the caterpillar or choose contrasting colors
Glue
Scissors
Ruler
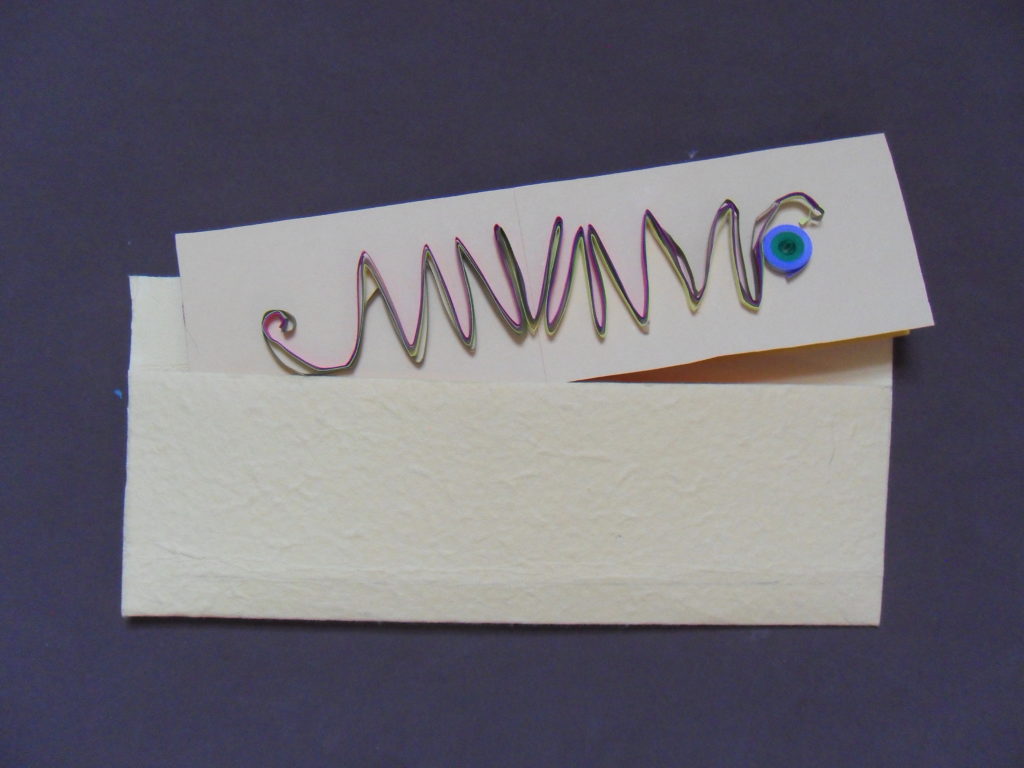
Glue the tips of the four quilling papers at one end. Curl slightly. Leaving 1 ½” begin to fold the rest of the papers like an accordion. Fold tightly as you go along.
Leaving another 1 12” use your finger to make the antennae of the caterpillar. Curl the tips.
Take the two 12” strips different colors and glue the tips. Curl into a tight coil. Use the one color first and then add the other or wind them together. When finished winding, glue the tips and glue below the antennae. Glue the caterpillar to cardboard or cardstock.
THEN MAKE THE QUILLED CATERPILLAR NOTE CARD
MATERIALS:
Cardstock of various colors
Scissors
Pencil/ruler
Glue stick
- Trim mounted caterpillar to an even length and width. The sample shown is 8” x 2 ½”.
- Measure and cut a piece of cardstock to 8” x 4 ½” doubling the height of the cardstock but keeping the width to 8”. (Cardstock used for scrapbooking is ideal.) Choose a color that picks up one of the colors of the caterpillar. Fold in half.
- Cut and measure a piece of cardstock of another color to 8” x 2 ¼”. Glue the three pieces together, trimming where necessary.
- Select a fourth sheet of cardstock. This piece of cardstock and compliment or contrast the other colors. Measure an area 6 ½” x 8 ½”. Then subdivide an area 8 ½” x 2 ½” and mark it lightly with a pencil.
- Above that measure an area 2 ½” x 8 ½” and mark it with a pencil.
- Above that measure an area 1” x 8 ½” with pencil, too. Fold the marked areas forming an envelope. Glue the three sides at the edges.
- Insert the quilled card in the envelope. You have a blank card to write a thank you or a thinking of you note.


Share this: