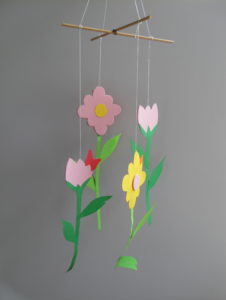
Tag Archives: flowers

CELEBRATE THE SEASONS! Spring is Here! Mobile

CELEBRATE THE SEASONS! Spring is Here! Mobile
SPRING MOBILE

SPRING MOBILE

Ages: 5 – 12 years

Time: ½ hour – 1 hour

MATERIALS:

Construction paper or craft foam in 4 pastel colors

Eraser/ Pencil

One dowel rods cut to 12”

Tacky glue or glue stick

Patterns from the Banners project

Hole puncher

Ball of jute or string or wire

Scissors


  1. Ask an adult to cut the dowel rods so that you have two. Cross them in the middle and tie them tightly with a piece of string or jute or wire. Lay aside.
  2. Select the paper or craft foam or use a combination of papers and craft foam. Trace and cut shapes from the patterns used for the Spring Is Here! Banner. Vary the sizes of the flowers. Add a yellow circle for the center of the daisy.
  3. Poke a hole near the top of the paper or craft foam shapes with a pencil or use a hole puncher. Then, lace a piece of string or jute or wire 6” to 8” in length through the hole at the top of each shape. Poke a hole at the bottom of the flowers and have some of them cascade downward. Tie the shapes to the dowel rods. To balance the mobile, place two or more shapes on each dowel rod and be sure that some of the shapes hang lower (or higher) than some of the others. This is called balancing or making the mobile level. Ask an adult for help if you need it.
  4. Tie a piece of string in the middle of the two dowel rods for hanging. Does your sculpture move? What makes it move? How is this design different from the banner design? What are the differences? What are the similarities?
Share Button

RECYCLED CRAFT PROJECT: PAPER BAG BOUQUETS

RECYCLED CRAFT PROJECT: PAPER BAG BOUQUETS
PAPER BAG BOUQUET

PAPER BAG BOUQUET


MATERIALS:

Dried or silk flowers

Small brown paper bags

Sand, beans, rice, or bird seed for the base

Scissors or clippers

Raffia, twine, yarn, ribbon or string

Washi tape

Rubber stamps (optional)

Ink pads (optional)

Crimping scissors


PROJECT:

  1. Cut your bag to the size you desire.* Fill it with sand, beans, rice, or bird seed. This will hold the flower stems and keep your bag from falling over.
  2. Trim the top of the bag with the crimping scissors to give it a more decorative look.
  3. Use washi tape to decorate the bag. Or use rubber stamp designs in different colors.
  4. Cut the stems of the flowers short enough so they don’t fall over when you stick them in the bag.
  5. Tie string, ribbon or raffia around the neck of the bag.

*Any size bag will do as long as the flower stems show above the top of the bag.

VARIATION:

Use rubber stamps and ink pad to decorate the bags. Before the ink dries, sprinkle the designs with glitter dust. Shake the excess off. Allow to dry before completing project.

Share Button

El Dia de los Muertos Banner Design

El Dia de los Muertos Banner Design
El Dia de los Muertos Banner

El Dia de los Muertos Banner


Materials:

Felt in various colors

Puffy paint in bright and metallic colors

Pencil/eraser

Scissors

Glitter glue (optional)

Hole punch

Paper in various colors (optional)

Scraps of material (optional)

Decorative gems (optional)

String

Cardboard

White glue


Project:              

  1. Select a piece of felt for the background of the banner. Place the design vertically or horizontally.
  2. Using different colors of the felt and using the letter stencils, trace and cut three Es; one A; two L; one D; one I; two O; two S; one T; one U; and one R.
  3. Arrange the letters on the felt background. Glue. Allow to dry.
  4. Some objects associated with the Day of the Dead are skeletons, marigolds and skulls. Draw and cut flowers, skulls and skeletons out of the remaining felt or use paper or another material. Glue and let dry.
  5. Add sequins, glitter, beads, etc. to the overall design or add a starburst, the sun or other symbols appropriate for the holiday. Let dry.
  6. Punch holes in the top corners of the felt. Pass a piece of string longer than the length of the banner through one hole, tie a knot and then pass it through the second hole. Glue a strip of cardboard that fits between the holes and glue it to the back of the banner at the top. Let dry and hang up. Celebrate El Dia de los Muertos!
Share Button